Synology Setup Guide
Setup Guide for Synology NAS
- Synology Initial Setup Guide (DSM Version 7)
- Synology NAS Setup & Configuration: Initial Steps
- Shared Folder Setup
- Data Protection and Monitoring Setup
- Setting up Updates
- Synology Security Guide & Best Practices
Synology Initial Setup Guide (DSM Version 7)
Guide for setting up Synology NAS system and Services
Synology NAS Setup & Configuration: Initial Steps
These setup goes over a Synology NAS whether purchased new or factory reset. Ensure that your NAS is plugged in and has internet access before proceeding.
This Guide covers 7.0 Version install, and it assumes that NAS is plugged in, has drives and is truned on.
Find Synology NAS & Install DSM

- You will be informed that all data on your drives will be deleted. If you agree, select the checkbox next to I understand that all data on these drives will be deleted, then Continue
- DSM will install and reboot when finished. After a few minutes have passed, open a new tab and navigate to your synology IP address or http://find.synology.com
- Give your DiskStation
- Server Name (Device Name)
- Username and Password
-
The next step will ask you to create a Synology account. You can do this at a later time if you’d prefer
- The next step will ask you to enable Synology Active Insight and configuration backups. Select whichever you’d prefer, then proceed
Set up a Synology NAS Storage Pool/Volume
DSM 7 has made storage pool creation incredibly easy and straightforward. You will be prompted immediately to set up a Storage Pool and Volume, but if you’re not, open the Storage Manager and select Storage, then Create a Storage Pool.
- You will be brought to a wizard that will guide you through the setup process. Select Start
- Give your storage pool a description if you’d like, select the RAID type you will be using and select Next to proceed
- Select the Hard Drives (generally all of them) that you’d like in this Storage Pool and select Next. NOTE: You can always add drives later and expand your storage pool/volume
- You will be prompted that all data on the drives will be erased. Select Continue
- The next option will ask if you’d like to perform drive checks. If you’d like to test the drives, you can select Perform drive check. If you’d like to skip it, select Skip drive check
- This next section will determine how much of the volume you’d like to allocate. Generally, most people will use all of it, so you can select Max. If you’d like to use something smaller, you can enter the value
- Click Apply and your storage pool will be created
Setup Static IP
To setup Synology NAS with static IP address so that it’s always the same. It’s best to make a DHCP reservation in your router’s configuration.
- Go to Unifi > Client Devices
- Select Synology NAS and under setup select Static IP. This will automatically assign one, but you can change it if you want, just make sure you restart computer after
Its also a good idea to set a static IP address from DSM, although not needed if router DHCP is set correctly
- Go to the Control Panel and select Network Interface. Select Edit on the LAN device

- Select Use manual configuration and enter the IP Address you’d like to use
- The subnet mask, gateway, and DNS server can all stay as default (since they were pulled from DHCP). Select OK
- Your network settings will apply and your DSM session will refresh with your new IP address.
Shared Folder Setup
- Open Control Panel and select Shared Folder.

- Select Create. A new dialogue box will appear where you’ll need to change a few settings:
- Name: Name of the Shared Folder.
- Description: Description you’d like to use.
- Location: Volume you’d like to use.
- The next three options are personal preference based on if you’d like the folders visible to others and if you’d like a recycle bin enabled (so files aren’t deleted permanently).

- Click Next
- The next screen will ask if you’d like to encrypt the shared folder. If you would, select the checkbox and enter an encryption key.
A few things to note with encrypted files: Encrypted files work by mounting/unmounting them with the encryption key (password) in DSM. When you mount the folder, it functions the same way as other shared folders do. It simply gives you the option to unmount the shared folder when you’re done adding files.
When the drive is unmounted, no one can access the files until you mount the folder again. If you lose the encryption key, your files will be lost forever. Keep it somewhere safe!
- Enable data checksum (if applicable) and file compression/folder quota if you’d like. Select Next.
- Select Next and Confirm Settings if everything looks as desired

- After the folder is created, you will be brought to the folder’s permissions. Change the permissions to match what you’d like. Your folder is now created!
- Change local users to Groups to so it's group based rather then user based, for better control.

Data Protection and Monitoring Setup
Now that a storage pool, volume, and shared folder are created, we need to change a few settings to protect and monitor our data.
Set up a Data Scrubbing Schedule on a Synology NAS
Data scrubbing inspects your volumes and modifies detected inconsistencies. In simple terms, this protects your NAS against bit-rot. There isn’t a specific schedule that’s mandatory, but it’s a good idea to run it at a minimum, bi-annually.
- Open Storage Manager, select Storage Pool, then Schedule Data Scrubbing. Then select Set Schedule

- Select Enable Data Scrubbing schedule, then select the Storage Pool, select a Frequency and Save

Set up Snapshots on a Synology
The easiest way to think of snapshots is that they “freeze” your files in time and allow you to recover those files later if necessary.
Every time a snapshot is created, a “restore” point is created, which allows you to recover files/folders from a point in time. The best part about this is that the snapshots themselves take up very little space and give you tons of flexibility!
- Open the Package Center, search for Snapshot and install the Snapshot Replication package.

- When the install finishes, launch the Snapshot Replication application. Select Snapshots and select settings on the folder you’d like to schedule protection for.

- Enable the snapshot schedule. At this point, there are two final settings you’ll need to check:
- Retention: Select how many snapshots you’d like to retain. Depending on the file type (and size), you’ll most likely have different retention policies for different folders.
- Snapshot Visibility: If you would like snapshots to be visible, select the checkbox under the Advanced section.

- After the snapshots have been configured, your system will start to create snapshots regularly. When the retention policy hits its maximum, old snapshots will be deleted.
Set up a Recycle Bin Task on a Synology NAS
By default, the recycle bin will retain files until you empty it. However, there’s an easy way to set up a schedule so that your NAS automatically deletes these old files after a certain period of time.
- Open the Control Panel and select Task Scheduler
- Select Create, then Scheduled Task, then Recycle Bin

- General: Enter a Task Name.

- Schedule: Specify when you’d like the task to run.

- TaskSettings: Specify if you’d like all recycle bins to empty or only specific ones.
- Retention Policy: This is an important step! I retain all deleted files for 14 days, but this is completely personal preference. This setting specifies when files are deleted. There are also advanced settings you can check.

This is very important because when you’re using a NAS, you generally have data rotating like snapshots and backup files.
Set up the Storage Analyzer on a Synology NAS
The storage analyzer allows you to see what files/folders are taking up space on your NAS and if any duplicates exist. It’s a powerful tool that periodically comes in handy.
- Open the Package Center, search for Analyzer, and install the Storage Analyzer package.

- When it’s done installing, open the package. You will be asked to specify a location to save your reports. Select Yes. Specify a location to save your reports and the frequency you’d like reports generated.

- A wizard will then start to assist you in the creation of the scheduled task. Give your report a name, set a schedule, and then specify the total number of reports you’d like to keep.
- Keep all Report Types selected (unless you don’t want specific ones generated) and click
- Determine if you’d like to analyze all current and future shared folders, then select

- Select the settings you’d like to use to find duplicate files.

- Select Generate reports now, then Done, and the process is officially set up!

This might not seem important on the surface, but understanding how your storage is being used is integral!
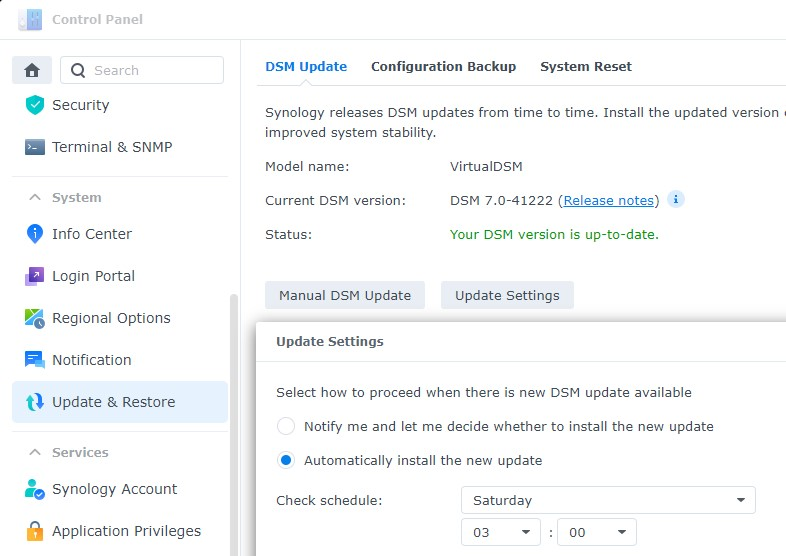
Setting up Updates
Installing Synology’s newest updates should at the top of your list. Not only do you get new features, but more importantly, you get the newest security enhancements.
- Open Control Panel and select Update & Restore
- Select Update Settings and Automatically install the new update. Pick a date and time (preferably during the middle of the night) that updates will install
Synology Security Guide & Best Practices
Steps for securing Synology NAS system
User Security & Access Control
The majority of NAS security needs to be done preventatively to easily recover from potential issues that might arise in the future.
It’s important to note that cybersecurity is always evolving and staying up to date with best practices is important. These are things I normally change, but depending on your needs, you can potentially secure your NAS even further.
Making sure that every user on NAS system is properly created, assigned, and given least amount of privilege, can help with reducing any type of cyberattack.
Disable Admin Account
First we must create a new user and ensure that they have admin permissions before disabling the admin user. Disabling Guest account is good practice as well, but it's personal preference, if group based access is properly managed.
- Select Control Panel, then select User & Group and Edit the admin user

- Select Disable this account, then select Save. This will ensure that the admin account is disabled

Enable Two Factor Authentication
- Select the Person icon in the top right and select Personal

- Select Enable 2-step Authentication. The email service will need to be enabled for this

- Select 2-step Authentication, then Verification code (OTP).
- Select Next to protect your DSM account with 2-factor Authentication

The next section will suggest that you install Synology’s Secure SignIn. This is not required. This is simply Synology’s TOTP application – you are free to use whatever TOTP application you’d like.
- Scan the QR code, enter the code, then select Next.
- Set up the Email service provider, then select Next
- Two- factor authentication is now set up
If you’d like to force all users to set up two-factor authentication
- Go to Control Panel
- Under Security select Account and under 2-Factor Authentication select All users or Specific users or groups. It's good idea to have any users that can remotely access NAS to have MFA setup, both TOTP and Push Notification with Synology Secure SignIn

Enable Auto Block
Auto block will automatically block IP addresses that have failed a certain number of logins during a certain period of time.
- Open Control Panel and select Security
- Select Account. Ensure Enable auto block is selected. Set the Login Attempts and Within parameters to be what you’d like, then apply. This will ensure that IP addresses are automatically blocked after a certain number of failed login attempts

Disable SSH
There are multiple reasons why you might want to use SSH, but if you’re not actively using it, you should disable it. Even if you enable two-factor authentication above, SSH does not use it. For this reason, if your network is compromised, an attacker can try and brute force your password through SSH.
- Open Control Panel, then select Terminal & SNMP.
- Ensure that Enable SSH service is not checked off.
