SSH Commands and Guides
OpenSSH guide in using terminal and multiple benefit function to make ssh easy and secure
- Public Key Setup & Management
- SSH Key Authentication Create and Share
- Managing Multiple SSH Keys
- SSH Agent for Passphrase Management
- Disable Password Login
- New Server Hardening- VPS
- Setting Up Automatic Updates on Debian
- Expanding VM Filesystem Size
- Setting up Debian based Linux PC with Fingerprint Authentication
- Proxmox Troubleshooting and Commands
Public Key Setup & Management
SSH Key Authentication Create and Share
Why SSH Keys are Important? SSH keys use asymmetric encryption—a public key is placed on the server, and a private key stays on your device.
Benefits over Passwords
- Security: Keys are far more resistant to brute-force attacks than passwords
- Convenience: No need to type passwords every time
- Automation: Ideal for scripts and remote tasks
- Granular Access: You can assign different keys to different users or devices
Pre requisite- Needs OpenSSH if not already installed.
Generating SSH Keys
- On your local computer that will be used to establish connection with a server
- In terminal type following command
ssh-keygen -t rsa -b 4096 -C "key name""-t rsa" - specifies the type of key RSA
"b 4096" - Sets the key length to 4096 bits
"-C" - Adds a comment, optional
or use ed25519 for stronger encryption
ssh-keygen -t rsa -t ed25519 -C "key name"- Copy Public Key to Server
ssh-copy-id username@server_ipOr if you make multiple different keys
ssh-copy-id -i ~/.ssh/id_rsa_work.pub 'name of the key you want to copy' username@server_ip To See the public key
cat ~/.ssh/id_rsa.pubMore Info on managing multiple keys check Managing Multiple SSH Keys
When using Passphrase, it would be a good idea to have SSH Agent to manege them. More info at SSH Agent Management
Managing Multiple SSH Keys
If you use different keys for different servers or services (e.g., GitHub, work, personal), here’s how to keep it organized. Using different keys for different services makes things way more organized and secure. This way if one key gets compromised, you only need to change it for that service or server.
Creating Multiple Keys
- Login to machine you want to have access to server or services
- Open Terminal and Create Keys
ssh-keygen -t rsa -b 4096 -f ~/.ssh/id_rsa_work
ssh-keygen -t rsa -b 4096 -f ~/.ssh/id_rsa_personal 'adding path will make the key unique and wont override the previous one'- Send each key to it's designated server
ssh-copy-id -i ~/.ssh/id_rsa_work.pub username@server_ipUsing SSH Config File
For easier access adjust config file. This will tell which key goes to which session
# Work server
Host work-server
    HostName work.example.com
    User yourusername
    IdentityFile ~/.ssh/id_rsa_work
    IdentitiesOnly yes

# Personal server
Host personal-server
    HostName personal.example.com
    User yourusername
    IdentityFile ~/.ssh/id_rsa_personal
    IdentitiesOnly yes
Using SSH Agent is a good idea if using passphrase for each one, check out SSH Agent Management
SSH Agent for Passphrase Management
SSH Agent is a background process that keeps your keys unlocked during your session.
- Start the agent and add keys:
eval "$(ssh-agent -s)"
ssh-add ~/.ssh/id_rsa_work
ssh-add ~/.ssh/id_rsa_personal
Per each key added to ssh you will need to type a phrase
Disable Password Login
Once we have ssh key setup we can disable password login on servers once keys are set up. This way our server and services are more secure.
- SSH to server
- Edit sshd_config file
sudo nano /etc/ssh/sshd_config- Set Authentication to No
PasswordAuthentication no- Restart SSH
sudo systemctl restart ssh
New Server Hardening- VPS
Guides on Setting up VPS servers and making sure they are as secure as possible
Linux Server Hardening- VPS
These steps go over ways to help harden your Linux Server, especially on a VPS. As VPS servers are public, adding additional security is crucial.
Requirements
- linux-Debian server has been installed
- SSH public key has already been shared with VPS setup, or ssh over to the server. Check Create and Share SSH Key Documentation for more info
More about these steps at dnuburgess GitHub
Initial Server Setup
New Sudo User Setup
- Update System Packages to ensure your system is up to date
sudo apt update && sudo apt list --upgradable && sudo apt upgrade -y && sudo apt autoremove -y- Set up Timezone, as accurate time is important for logs and scheduled tasks
sudo dpkg-reconfigure tzdata- Create Non- Root User, never operate directly as root. Create a new user and give it sudo privileges
adduser <your_new_user>sudo usermod -aG sudo <your_new_user>Some VPS systems won't allow you to use public key for ssh that root has access to. You will need to manually add it to the list
- Create the .ssh Directory (if it doesn't exist)
mkdir -p ~/.ssh
chmod 700 ~/.ssh- Add Public Key
echo "your_public_key_contents" >> ~/.ssh/authorized_keys
chmod 600 ~/.ssh/authorized_keys
Relogin using ssh key toyour new user
Secure SSH Connection with SSH Key Only Authentication
Also, very important consideration is to disable password login, enable passkey login only to use ssh key you just set up, and few other security options
First create and share key to the server SSH Key Authentication Create and Share
- Login to server and edit SSH Config File
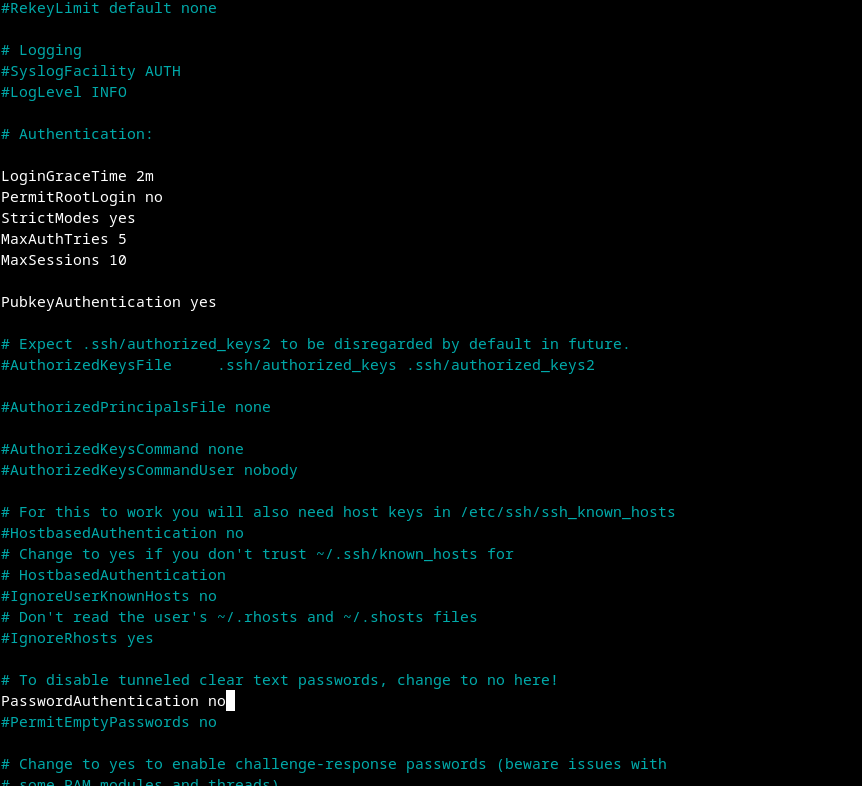
sudo nano /etc/ssh/sshd_configModify the file like picture below
- LoginGraceTime- This setting defines how long (in minutes) the server will wait for a user to log in before disconnecting. A shorter time can help reduce the window for brute-force attacks.
- PermitRootLogin- If you want to enhance security, consider changing this to PermitRootLogin no to prevent direct root logins. Instead, use a regular user with sudo privileges for administrative tasks.
- StrictModes- This setting ensures that the user's home directory and .ssh directory have the correct permissions. It helps prevent unauthorized access.
- MaxAuthTries- This limits the number of authentication attempts per connection. If a user exceeds this limit, the session will be terminated, which helps mitigate brute-force attacks.
- MaxSession- This setting limits the number of concurrent sessions per connection. If you have multiple users connecting, you might want to keep it higher.
- Save and Exit
- Restart SSH Service
sudo systemctl restart ssh
Firewall Setup
Setup ufw on the machine for extra security
- Install ufw (if not already installed)
sudo apt install ufw- Set Default Policies by configuring the default policies to deny all incoming traffic and allow all outgoing traffic
sudo ufw default deny incoming
sudo ufw default allow outgoing- Change SSH to a custom port
sudo nano /etc/ssh/sshd_config#Port 22, delete '#' and put custom port number
- Run systemd socket activation
sudo systemctl daemon-reload
sudo systemctl restart ssh.socket
sudo systemctl restart ssh- Confirm that SSH is listening to new port
sudo ss -tulpn | grep ssh
# should show something like: 0.0.0.0:42- Add SSH firewall rule and add rate limiting
sudo ufw allow 42/tcp
sudo ufw limit 42/tcp- Add other necessary ports
sudo ufw allow https
sudo ufw allow http
# optional: sudo ufw allow 51820/udp- Enable ufw
sudo ufw enableCheck the ufw status to make sure everything is running and all rules are set properly
sudo ufw status verboseSet Up Automatic Security Updates
Enable automatic updates for any new security pathes
- Install Unattended Upgrades
sudo apt install unattended-upgrades apt-listchanges- Reconfigure Unattended Upgrades
sudo dpkg-reconfigure --priority=low unattended-upgradesFall2ban Setup
Fail2ban watches your system logs for repeated failed login attempts. When it sees too many failures from the same IP, it automatically bans that IP using your firewall.
It protects services like:
- SSH
- Nginx / Apache
- FTP
- Postfix / Dovecot
It’s basically an automated bouncer for your server.
Configure Fall2ban
- Install Fall2ban
sudo apt update
sudo apt install fail2ban- Enable SSH jail
sudo nano /etc/fail2ban/jail.localAdd
[sshd]
enabled = true
port = 42
logpath = /var/log/auth.log
maxretry = 5
Save and Exit
- Restart Fall2ban
sudo systemctl restart fail2ban- Check status
sudo fail2ban-client statussudo fail2ban-client status sshdSetting Up Automatic Updates on Debian
Having automatic updates on linux machine can be beneficial to stay up to date with latest patches. At very least security updates should be enabled
Set up Automatic Updates
- Install Unattended Upgrades
sudo apt install unattended-upgrades apt-listchangesAt Very Least Reconfigure Unattended Upgrades for Security Patches
sudo dpkg-reconfigure --priority=low unattended-upgrades- Configure unattended-upgrades file
sudo nano /etc/apt/apt.conf.d/50unattended-upgradesYou can enable security updates and other types of updates by uncommenting the appropriate lines.
Unattended-Upgrade::Allowed-Origins {
    "${distro_id}:${distro_codename}-security";
    "${distro_id}:${distro_codename}-updates";
};- Enable Automatic Updates
sudo nano /etc/apt/apt.conf.d/20auto-upgradesAdd or Modify following lines
APT::Periodic::Update-Package-Lists "1";
APT::Periodic::Unattended-Upgrade "1";
This configuration will check for updates daily
Expanding VM Filesystem Size
If the VM hits the size limit, but there is more space allocated, or you allocated the space. These steps will help with expanding the size of the volume.
Checking the Size
- Check Disk Usage to see which disk is affected
df -h- Check volume group for free space
sudo vgdisplayIf there is no space, you will need to allocate more trough Hypervisor
Expanding filesystem roof
- Extend logical volume
sudo lvextend -l +100%FREE /dev/ubuntu-vg/ubuntu-lvThis will add remaining space to the root system
- Resize filesystem
sudo resize2fs /dev/ubuntu-vg/ubuntu-lv- Verify disk size and usage
df -h /
Setting up Debian based Linux PC with Fingerprint Authentication
Here’s the complete step-by-step guide including cosmic-greeter setup for fingerprint login on Pop!_OS
Fingerprint Setup on Pop!_OS (Lenovo ThinkPad with COSMIC)
- Install Required Packages
sudo apt update && sudo apt install fprintd libpam-fprintd- Reinstall cosmic-greeter (if needed). Ensure the login manager is working:
sudo apt install --reinstall cosmic-greeter- Enable Fingerprint in PAM
sudo pam-auth-update- Use arrow keys to select "Fingerprint authentication". Press Space, then Tab → Enter
- Enroll Your Fingerprint
fprintd-enroll- Swipe your finger until you see enroll-completed. You can specify a finger
fprintd-enroll -f right-index-finger- Reboot
sudo rebootAfter reboot
- Go to Settings > Users — you should see "Fingerprint Login" enabled
- Use Fingerprint
- At login: Swipe instead of typing password
- For sudo: Run sudo ls and use your finger
Troubleshooting
- No fingerprint option?
sudo pam-auth-update --enable fprintd
BIOS conflict (ThinkPad):
Enter BIOS → Security → Fingerprint → Disable "Predesktop Authentication"
Proxmox Troubleshooting and Commands
- Update Proxmox
apt update && apt dist-upgrade -y- List all VMs
qm list- List all containers
pct list- Check storage
pvesm status- Check cluster status
pvecm status- Check HA status
ha-manager status- View running services
systemctl list-units --type=service --state=running- View system logs
journalctl -f- Proxmox Service Management
systemctl restart pveproxy        # restart web interface
systemctl restart pvedaemon       # restart main daemon
systemctl restart pvestatd        # restart stats daemon
systemctl status corosync         # check cluster communication
systemctl status pve-ha-lrm       # check HA Local Resource Manager