# Proxmox Virtual Environment Setup
Complete Setup & Configuration Guide to setup Proxmox with prioritizing security
# Installation
This article walks through downloading the Proxmox VE ISO, creating a bootable USB drive, and installing Proxmox on your server hardware.
Note: Proxmox VE is a bare-metal installer. The entire target drive will be erased. Back up any important data before proceeding.
### Creating Bootable Drive
1. Download the Proxmox VE ISO
2. Visit the official Proxmox [download page](https://www.proxmox.com/en/downloads)
3. Select the latest Proxmox VE ISO Installer and download it to your computer.
4. Create a Bootable USB Drive Using [Rufus](https://rufus.ie) or [Etcher](https://etcher.balena.io)
5. Open Rufus, select your USB device, select the Proxmox ISO, and click Start
6. Accept any format warnings- all data on the USB will be erased
### First Boot and Install
1. Insert the USB into your Proxmox server and power it on
2. Enter BIOS/UEFI (usually F2, F12, DEL, or ESC at boot) and set USB as the first boot device
3. At the Proxmox boot menu, select: Install Proxmox VE (Graphical)
Note: If the graphical installer hangs or fails, try 'Install Proxmox VE (Terminal UI)' — it has better hardware compatibility.
4. Accept the End User License Agreement (EULA)
5. Select Target Hard Disk — click Options to choose the filesystem:
• ext4 (default) — simple, reliable, good for most setups
• ZFS — advanced, supports RAID, snapshots, data integrity checksums (requires more RAM)
6. Configure Location & Time Zone — select your country, time zone, and keyboard layout
7. Set the Administrator Password — set a strong root password and enter an email address for alerts
8. Configure Network Settings:
• Select your network interface (NIC)
• Hostname: e.g., pve.localdomain
• IP Address: set a static IP (e.g., 192.168.1.100)
• Netmask: typically 255.255.255.0
• Gateway: your router's IP (e.g., 192.168.1.1)
• DNS Server: e.g., 8.8.8.8 or your router's IP
9. Review the summary and click Install
10. Once installation completes, remove the USB drive and click Reboot
### First Access via Web Browser
1. On another computer, open a web browser
2. Navigate to your Proxmox server's IP and port 8006:
[https://192.168.1.100:8006](https://192.168.1.100:8006)
3. Accept the self-signed SSL certificate warning in your browser
4. Log in with:
• Username: root
• Password: (the password you set during installation)
• Realm: Linux PAM standard authenticatio
Note: You will see a 'No valid subscription' popup — this is normal for the free/community version. Click OK to dismiss it.
# Web Console Tour & Preliminary Setup
This article covers the Proxmox web interface, the primary tool for managing your server, VMs, and containers. Also, best practices for first login.
### Post-Install Configuration (Highly Recommended)
Disable the Enterprise Repository (No Subscription)
1. In the web console, select your node (e.g., 'pve') in the left panel
2. Go to: Updates > Repositories
3. Select the enterprise repository line (pve-enterprise) and click Disable
4. Click Add and select 'No-Subscription' repository
5. Update the System
```bash
apt update && apt dist-upgrade -y
```
6. Reboot after updating
```bash
reboot
```
### Navigating Web Interface
**Left Panel — Server View**
• Datacenter — top-level settings (cluster, permissions, storage, etc.)
• Your Node (e.g., 'pve') — the physical server
• Virtual Machines and Containers appear as children under the node
**Node Options (click your node)**
• Summary — CPU, memory, disk, and network stats
• Notes — add documentation/notes about your server
• Shell — opens a terminal session on the Proxmox host
• Updates — check and apply system updates
• Disks — view physical disks and manage LVM/ZFS
• Network — view and configure network interfaces and bridges
• DNS — configure DNS settings
• Time — configure time zone and NTP
• Syslog — view system logs
• Task History — see all past tasks and their results
**Datacenter Options**
• Summary — overall cluster status
• Storage — add and manage storage backends
• Backup — schedule automatic backups
• Replication — configure storage replication
• Permissions — manage users, roles, and access controls
• HA — high availability configuration
• Firewall — datacenter-level firewall rules
# Building a Virtual Machine & Templates
This article covers creating and configuring a full virtual machine in Proxmox. The example uses Ubuntu Server as the guest OS. Ubuntu Server is best lightweight option for running server as virtual machine. Unlike Ubuntu Desktop, this VM is accessed via command line, doesn't have GUI.
### Uploading ISO Image
1. In the web console, navigate to your node > local storage > ISO Images
2. Click Upload and upload a Linux ISO (e.g., Ubuntu Server), OR
3. Click Download from URL and paste a direct ISO link to have Proxmox download it directly
### Create Virtual Machine
1. Click the Create VM button in the top right corner
2. General tab:
• Node: select your node
• VM ID: auto-assigned (e.g., 100)
• Name: give it a descriptive name (e.g., ubuntu-server)
3. OS tab:
• Select the uploaded ISO from storage
• Guest OS Type: Linux; Version: 6.x - 2.6 Kernel
4. System tab:
• Machine: Default (i440fx) for Linux; q35 for Windows or PCIe passthrough
• BIOS: SeaBIOS (default) or OVMF (for UEFI)
• Enable Qemu Agent — check this box (we will install the agent later)
5. Disks tab:
• Bus/Device: VirtIO Block (virtio0) — best performance
• Storage: local-lvm (default)
• Disk Size: 32 GB minimum for Ubuntu Server
• Enable SSD emulation if using an SSD-backed storage
6. CPU tab:
• Sockets: 1
• Cores: 2 (or more depending on your server)
• Type: x86-64-v2-AIO or host (host gives best performance but reduces migration flexibility)
7. Memory tab:
• RAM: 2048 MB (2 GB) minimum for Ubuntu Server
• Enable Ballooning if you want dynamic memory allocation
8. Network tab:
• Bridge: vmbr0 (the default bridge connected to your physical NIC)
• Model: VirtIO (paravirtualized) — best network performance
9. Confirm tab — review settings and click Finish
### Start and Install the OS
1. Select your new VM in the left panel
2. Click Start, then click Console to open the display
3. Follow the OS installation wizard (Ubuntu Server example):
• Select language and keyboard layout
• Configure network (DHCP by default)
• Configure storage — use the entire disk
• Create your user account and set a password
• Install SSH server when prompted (important for remote access)
• Complete installation and reboot
### Virtual Machine Templates
Templates allow you to quickly clone new VMs without repeating the installation process.
Note: Converting a VM to a template is permanent. Clone it first if you want to keep the original running VM.
#### Preparing a VM for Template
1. Start with a fully installed and updated VM
2. Log into the VM and clean it up:
```bash
sudo apt clean
sudo apt autoremove -y
```
3. Clear machine-specific data (cloud-init or sysprep approach):
```bash
sudo apt install -y cloud-init
```
4. Clear the machine ID so each clone gets a unique one:
```bash
sudo truncate -s 0 /etc/machine-id
sudo rm /var/lib/dbus/machine-id
sudo ln -s /etc/machine-id /var/lib/dbus/machine-id
```
5. Shut down the VM:
```bash
sudo shutdown -h now
```
#### Converting to a Template
1. In the Proxmox web console, right-click the VM
2. Select Convert to Template
3. Confirm the VM icon changes to a template icon
#### Cloning from a Template
1. Right-click the template and select Clone
2. Choose:
• Mode: Full Clone (independent copy) or Linked Clone (shares template disk, faster but dependent)
• Name: give the new VM a name
• Target Storage: where to store the clone's disk
3. Click Clone Proxmox creates the new VM
4. Configure the clone (resize disk if needed, set static IP, etc.) before starting it
# Building Containers (LXC) & Templates
LXC containers are a lightweight alternative to full VMs. They are ideal for running Linux services with minimal overhead. However they are running as rootless, so there is little more risk to compromising hypervisor itself as it shares kernel, unlike VM. Best for internal only apps.
Note: Privileged containers run as root and have more hardware access. Unprivileged containers are more secure and recommended for most use cases.
### Download Container Template
1. In the web console, navigate to your node > local storage > CT Templates
2. Click Templates
3. Browse the template library, select a distro (e.g., Ubuntu 22.04), and click Download
### Create an LXC Container
1. Click Create CT in the top right corner
2. General tab:
• Node: your node
• CT ID: auto-assigned
• Hostname: e.g., ubuntu-ct
• Password: set the root password for the container
• SSH public key: optionally paste your public key for key-based access
3. Template tab: select the downloaded template
4. Disks tab:
• Storage: local-lvm
• Disk size: 8 GB is often sufficient for light services
5. CPU tab:
• Cores: 1–2 (containers share host CPU efficiently)
6. Memory tab:
• Memory: 512 MB – 1024 MB for most services
• Swap: 512 MB
7. Network tab:
• Bridge: vmbr0
• IPv4: DHCP or set a static IP/CIDR (e.g., 192.168.1.101/24)
• Gateway: your router IP
8. DNS tab: leave default or set your preferred DNS server
9. Confirm and click Finish
#### Start the Container
1. Select the container, click Start
2. Click Console to open a terminal session
3. Alternatively, SSH into the container using its IP address
4. Update the container:
```bash
apt update && apt upgrade -y
```
### Creating Container Template
Just like VM templates, you can convert a configured LXC container into a template for rapid reuse.
#### Preparing the Container
1. Configure your container as desired (install packages, set configs)
2. Clean up the container:
```bash
apt clean && apt autoremove -y
```
3. Shut down the container from the web console or:
```bash
poweroff
```
#### Converting to a Template
1. Right-click the container in the web console
2. Select Convert to Template and confirm
#### Cloning a Container Template
1. Right-click the template, select Clone
2. Set a name and target storage for the clone
3. Click Clone
4. Before starting the clone, update the hostname and network settings if needed
# User Management
Proxmox supports multiple users, roles, groups, and authentication realms. This is essential for any shared or production environment, as well as keeping access limited and secure.
Authentication Realms available in Proxmox
- **Linux PAM-** uses the host OS users (/etc/passwd). Root uses this realm
- **Proxmox VE** Authentication Server (PVE)- built-in Proxmox user database. Best for creating non-root admin accounts and GUI access
- **LDAP/Active Directory-** for enterprise integration
### Creating and Setting up New User
#### Create User
1. Go to Datacenter > Permissions > Users
2. Click Add
3. Fill in:
• User name: e.g., homelab-admin
• Realm: Proxmox VE Authentication Server
• Password: set a strong password
• Email, First/Last Name: optional
4. Click Add
#### Assigning Premissions
1. Go to Datacenter > Permissions
2. Click Add > User Permission
3. Set:
• Path: / (root, grants access to everything)
• User: the user you just created
• Role: Administrator (for full access) or PVEVMAdmin (for VM management only)
4. Click Add
#### Built In Roles
- Administrator — full control
- PVEVMAdmin — manage VMs (no host configuration)
- PVEVMUser — view and use VMs, no configuration
- PVEDatastoreAdmin — manage storage
- PVEAuditor — read-only access
Note: It is best practice to avoid using the root account for daily tasks. Create a named admin account for normal use.
# Backups & Snapshots
Protecting your VMs and containers with regular backups is essential. Proxmox includes built-in backup and snapshot tools. Also, it's good idea to connect Proxmox Backup Server if you have an option of running another server. This way backups are stored off site.
For configuring Proxmox Backup Server with Virtual Environment click [here](https://docs.cyberpaw.org/books/proxmox-ve-pbs-setup-guide/page/schedule-backup-job-with-pbs) for a guide
### Snapshots
Snapshots save the state of a VM or container at a point in time. They are fast but stored on the same storage as the VM — not a true backup.
1. Select a VM or container in the web console
2. Go to the **Snapshots** tab
3. Click **Take Snapshot**
4. Name the snapshot and add an optional description
5. Check 'Include RAM' if you want to capture the running memory state (only for VMs)
6. Click **Take Snapshot**
7. To store: select the snapshot and click **Rollback.**
Note: Snapshots use disk space and can impact VM performance over time. Do not rely on snapshots as your only backup strategy, rather as a quick reverse when you're working or configuring something on a VM.
### Manual Backups
1. Select a VM or container
2. Go to the **Backup** tab
3. Click **Backup Now**
4. Select **storage** (e.g., local), backup mode, and compression
5. Click **Backup-** Proxmox creates a compressed backup archive
Note: If you have PBS connected to your Proxmox system, you can change the Storage from Local to PBS.
### Scheduled Backups
1. Go to Datacenter > Backup
2. Click Add
3. Configure:
• **Node:** your node or all
• **Storage:** where to save backups
• **Schedule:** e.g., daily at 2:00 AM
• **Selection:** All VMs, specific IDs, or exclude certain VMs
• **Retention:** set how many backups to keep (e.g., keep last 7)
4. Click **Create-** the schedule is saved and runs automatically
#### Backup Modes
- Stop — stops the VM, backs up, then restarts. Cleanest backup.
- Suspend — suspends the VM briefly during backup. Less downtime.
- Snapshot — VM keeps running. Fastest but may have slight consistency risk.
# Integrated Firewall
Proxmox includes a built-in firewall that can be configured at the Datacenter, Node, and VM/Container level.
#### Firewall Hierarchy
- **Datacenter** — rules that apply to all nodes in the cluster
- **Node** — rules specific to the Proxmox host itself
- **VM/Container** — rules specific to individual VMs/containers
#### Enabling the Firewall
1. Go to Datacenter > Firewall > Options
2. Set Firewall to Yes (Enabled)
3. Do the same for your node: Node > Firewall > Options
4. For a specific VM/Container: select it > Firewall > Options > Enable
Warning: Always create rules to allow SSH (port 22) and the Proxmox web UI (port 8006) BEFORE enabling the firewall, or you may lock yourself out.
#### Creating Firewall Rules
1. Go to the relevant level (Datacenter, Node, or VM)
2. Go to **Firewall** > **Add**
3. Configure the rule:
• Direction: in (incoming) or out (outgoing)
• Action: Accept, Drop, or Reject
• Protocol: TCP, UDP, ICMP, etc.
• Source / Destination IP: leave blank for any, or specify an IP range
• Dest. Port: e.g., 22 for SSH, 8006 for Proxmox UI, 80/443 for web
• Comment: add a description for the rule
4. Click **Add**
#### Security Groups
Security groups are reusable sets of firewall rules. Create a group once and apply it to multiple VMs.
1. Datacenter > Firewall > Security Group > Create
2. Name the group (e.g., web-servers)
3. Add rules to the group
4. Apply the group to individual VMs in their firewall settings
# Networking
This article covers how to create additional network bridges and set up an isolated network for your virtual machines — separating VM traffic from the Proxmox management interface.
After installation, Proxmox creates one Linux bridge:
- **vmbr0** — connected to your physical NIC (eth0/enp3s0), carries management and VM traffic
#### Creating a New Bridge for VM Traffic
1. In the web console, go to your Node > Network
2. Click Create > Linux Bridge
3. Configure:
• Name: vmbr1 (or any available name)
• IP Address / CIDR: leave blank for a pure internal bridge (no host routing), OR assign an IP if you want the host to route between networks
• Bridge ports: leave blank for internal-only, or enter a NIC name to connect to physical network
4. Click Create, then click Apply Configuration
5. Reboot may be needed for changes to take full effect
#### Assigning a VM to a New Bridge
1. Select the **VM** > **Hardware** > Select the **network device**
2. Click **Edit,** change the **Bridge** to **vmbr1**
3. Click **OK**
4. **Reboot** the VM
#### NAT and Routing
This step is Optional. To allow VMs on an internal bridge (vmbr1) to reach the internet through the Proxmox host, enable IP forwarding and NAT:
1. Enable IP forwarding:
```bash
echo 'net.ipv4.ip_forward=1' >> /etc/sysctl.conf
sysctl -p
```
2. Add NAT rule (replace 192.168.100.0/24 with your VM subnet):
```bash
iptables -t nat -A POSTROUTING -s 192.168.100.0/24 -o vmbr0 -j MASQUERADE
```
3. Make the rule persistent (install iptables-persistent):
```bash
apt install -y iptables-persistent
```
# Shared Storage
Shared storage allows multiple Proxmox nodes to access the same storage pool, enabling live migration of VMs and centralized backup storage. Also, if you have multiple devices clustered together, this can enable High Availability.
Storage Types in Proxmox
- **Directory** — local filesystem path (default: /var/lib/vz)
- **LVM** / **LVM-Thin** — local or shared block storage
- **ZFS** — local ZFS pools
- **NFS** — network file share (NAS integration)
- **CIFS/SMB** — Windows network share
- **Ceph** — distributed block storage (enterprise/advanced)
- **iSCSI** — block-level network storage
Managing Storage
- Content: each storage type can hold different content types (ISO, backups, VM disks, etc.)
- Shared storage is available to all nodes in a cluster
- Local storage (local, local-lvm) is only available on the local node
#### Adding NFS Storage
1. On your NAS, create an NFS share and note its IP and export path
2. In Proxmox web console, go to **Datacenter** > **Storage** > **Add** > **NFS**
3. Configure:
• ID: give it a name (e.g., nas-storage)
• Server: IP address of your NAS
• Export: the NFS export path (e.g., /mnt/pool/proxmox)
• Content: select what to store here (Disk image, ISO image, VZDump backup file, Container template)
4. Click **Add,** the NFS share appears in the left panel under all nodes
#### Adding CIFS/SMB Storage
1. Go to **Datacenter** > **Storage** > **Add** > **SMB/CIFS**
2. Enter **Server IP, Share name, Username,** and **Password**
3. Select **Content types** and click **Add**
# Clustering
A Proxmox cluster groups multiple Proxmox nodes together, enabling centralized management, live migration (moving VMs between nodes), and high availability. When second node is connected to a cluster, it will assume primary cluster roles and authentication.
Pre Requisites:
- All nodes must be running the same or compatible version of Proxmox VE
- All nodes must be able to communicate over the network (low latency preferred)
- Odd number of nodes recommended (3+) for quorum
- Shared storage is recommended (but not required for basic clustering) for High Availability
Note: Creating a cluster on an existing node will reset some configurations. Set up clustering before deploying production VMs.
#### Creating the Cluster on Primary Node
1. On the primary node, go to **Datacenter** > **Cluster**
2. Click **Create Cluster**
3. Enter a **Cluster Name** (e.g., homelab-cluster)
4. Set the **Cluster Network** (the network ring used for cluster communication)
5. Click **Create**
6. Click **Join Information** and copy the join token
#### Adding Additional Nodes
1. Log into the second Proxmox node's web console
2. Go to **Datacenter** > **Cluster**
3. Click **Join Cluster**
4. Paste the join information from the first node
5. Enter the root password of the first node when prompted
6. Click **Join** — the node joins the cluster
Afterr joining, all nodes appear in the left panel of any node's web console. You can manage all VMs and containers across all nodes from a single interface.
#### Live Migration
1. Right-click a VM on any node
2. Select Migrate
3. Choose the target node
4. Click Migrate — the VM moves to the other node (live, with minimal interruption if using shared storage)
# High Availability
High Availability (HA) ensures that critical VMs are automatically restarted on another node if the node they are running on fails.
Prerequisites:
- A working cluster with at least 3 nodes
- Shared storage accessible by all nodes (so the VM disk can be accessed after failover)
- The HA manager service must be running on all nodes
Note: HA requires a quorum (majority of nodes must be online). With 3 nodes, you can tolerate 1 node failure. With 2 nodes, there is no quorum and HA will not function.
#### Enabling HA for a VM
1. Go to Datacenter > HA
2. Click Add under Resources
3. Select the VM ID you want to protect
4. Set the HA State:
• Started — HA will always try to keep this VM running
• Stopped — HA will manage the VM but leave it stopped
• Disabled — HA does not manage this VM
5. Set Max Restart — how many times to try restarting on the same node before migrating
6. Set Max Relocate — how many nodes to try before giving up
7. Click Add
#### HA Groups
HA groups define which nodes are preferred or required for specific VMs.
1. Datacenter > HA > Groups > Add
2. Name the group and select nodes
3. Set priority (higher = preferred) for each node
4. Assign a VM to the group in HA Resources
#### Testing High Availability
1. Start an HA-protected VM on one node
2. Simulate a node failure by powering off that node or running:
```bash
systemctl stop pve-cluster corosync
```
Watch the Proxmox web console — the VM should automatically start on another node
# Proxmox Troubleshooting and Commands
- Update Proxmox
```bash
apt update && apt dist-upgrade -y
```
- List all VMs
```bash
qm list
```
- List all containers
```bash
pct list
```
- Check storage
```bash
pvesm status
```
- Check cluster status
```bash
pvecm status
```
- Check HA status
```bash
ha-manager status
```
- View running services
```bash
systemctl list-units --type=service --state=running
```
- View system logs
```bash
journalctl -f
```
- Proxmox Service Management
```bash
systemctl restart pveproxy # restart web interface
systemctl restart pvedaemon # restart main daemon
systemctl restart pvestatd # restart stats daemon
systemctl status corosync # check cluster communication
systemctl status pve-ha-lrm # check HA Local Resource Manager
```
# Connecting Server Directory to Synology NAS (NFS Setup)
This is a step-by-step document on how to connect a server directory to a Synology NAS using NFS. This guide assumes you have access to both the server and the Synology NAS.
##### Prerequisites
Access to a server (Linux-based).
Access to a Synology NAS.
NFS service enabled on the Synology NAS.
Sufficient permissions to execute commands on both devices.
#### Configure NFS on Synology NAS
1. Access Synology NAS
2. Enable NFS Service by Going to **Control Panel > File Services**
3. Under the NFS tab, enable the NFS service
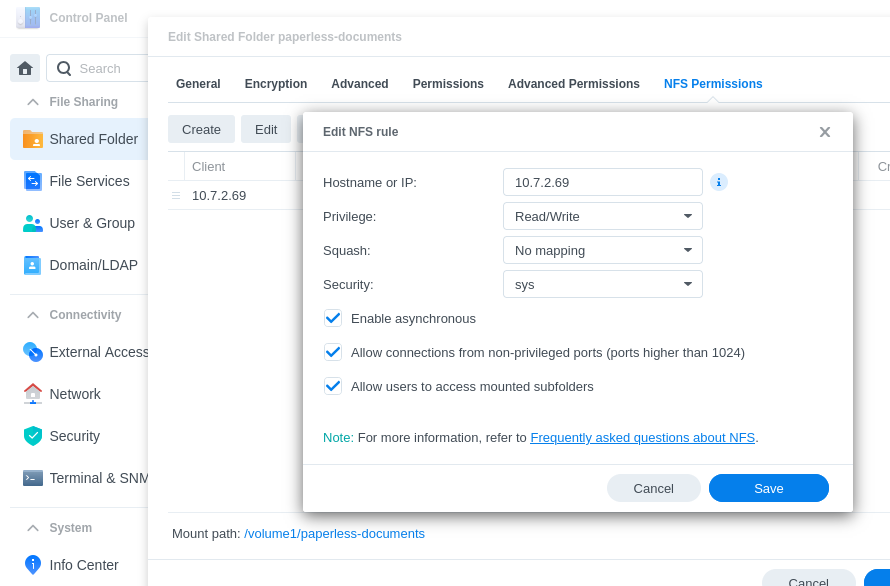
4. Configure NFS Permissions:
1. Navigate to Shared Folder in Control Panel
2. Select the folder you want to share (e.g., /volume1/paperless-documents)
3. Click on Edit > NFS Permissions
4. Click Create and set the following:
1. Hostname or IP: Enter the IP address of your server
2. Privilege: Set to Read/Write
3. Squash: Select No mapping to allow direct access
4. Asynchronous: Optional, you can enable this for better performance
5. Cross-Mount: Enable if you intend to mount cross-shared folders
6. Check Allow users to access mounted subfolders
5. Click **OK** to save the settings
#### Prepare Your Server
1. SSH into your server
2. Install NFS Client
```bash
sudo apt-get update
sudo apt-get install nfs-common
```
3. Create mount point- a directory where the NFS share will be mounted
```bash
sudo mkdir -p /mnt/nas/Import
```