Backups Setup
- Set Up Proxmox Backup Server with NFS Storage
- Schedule Backup Job with PBS
- Backing up Proxmox Virtual Environment to Synology NAS
- How to install Proxmox Backup Client
Set Up Proxmox Backup Server with NFS Storage
Proxmox Backup Server PBS is design to backup Proxmox Virtual Environment. Proxmox Backup Server is designed to run bare-metal on dedicated hardware, with dedicated drives for the operating system and backups. The main backup should be on bare metal and NFS Storage as additional job for redundancy. This article assumes that PBS is already set up and functional, and using Synology.
Note:
- When you configure a datastore in Proxmox Backup Server, it creates one hidden folder (.chunks) and one hidden file (.lock). These files must be created by the backup user (UID:34 / GID:34).
- This is the ultimate problem with using shared storage – most users don’t have a user and group named backup with the UID/GID of 34. This is a problem, because you’ll immediately run into permission issues attempting to create the two folders above.
- To get around this, you can change the ownership (chown backup:backup [mounted_folder]) to ensure the backup user and group own the folder….if your NAS allows it.
Setting up Shared Folder and Permissions on NAS
- Login to Synology DSM
- Open Control Panel and under Shared Folder click Create
- Add IP of PBS server
- Set Privilege to Read/Write
- Make sure Squash is set to Map all users to admin - in order for this to work

Make sure to add Firewall rule on Synology NAS to allow PBS IP to NFS application, as well as set Firewall rule on Unifi router to allow traffic from PBS to NAS.
Create Directory on PBS and connect to NAS via NFS
- Log in to PBS and access shell or access PBS via ssh
-
Make two directories in the PBS shell – one will be mapped temporarily, and the other will be used for creating the datastore.
mkdir /mnt/pbs-backups
mkdir /mnt/temp-
Change the ownership of the folder to the backup user and group. The system should do this automatically, but I like to do it regardless.
chown backup:backup /mnt/pbs-backups- Add the permissions on your NAS for NFS to the IP address of your PBS server. Steps Above
-
Update the fstab file so that the directory mounts automatically at boot to the NAS. This is done temporarily so that we can move the files from the local directory to the NAS.
nano /etc/fstab- Add the information below to the file to enable NFS connection, then save it
[IP_ADDRESS]:[LOCATION/FOLDER_ON_NAS] /mnt/temp nfs defaults 0 0- Mount the directory
mount -a-
Add a Datastore in PBS. Select Add Datastore, then give it a name, and add the backing path below. Remember, this will temporarily write the data locally, which we’ll then move to the NAS.
/mnt/pbs-backups
GC and Prune schedule can be set at later time. Or schedule them here

- Back on Shell. Move the data to the temp folder, which is technically mounted to the NAS. This might take a little while depending on your network speeds.
cp -R /mnt/pbs-backups/.chunks /mnt/pbs-backups/.lock /mnt/temp- Now that the data has been written to the NAS, we can mount the folder on the NAS to the pbs-backups directory.
[IP_ADDRESS]:[LOCATION/FOLDER_ON_NAS] /mnt/pbs-backups nfs defaults 0 0- Run the commands below to mount the directory to the new folder.
mount-a
systemctl daemon-reload- Reboot Proxmox Backup Server and see if the datastore is functional. You should be able to navigate the datastore, see the available storage, and create a prune schedule.
Connecting NFS storage from NAS to PBS is complete. Next step is to create Backup Job with PBS on Proxmox Virtual Environment server.
Schedule Backup Job with PBS
This guide goes over scheduling backup job with PBS server. Proxmox Virtual Environment can run it's own jobs, but for best optimization, using deducation and verify jobs, having PBS is good idea. Also, it provides redundancy if pve goes down.
Using Proxmox Backup Server (PBS) over Proxmox VE (PVE) native backups offers several significant advantages, particularly for environments requiring efficient, secure, and reliable backup management. The primary benefit is that PBS performs incremental backups, transferring only changed data since the last backup, which drastically reduces backup time and network bandwidth usage compared to PVE’s full backup approach that copies entire VM or container images each time. This incremental method, combined with advanced deduplication, ensures that duplicate data across multiple VMs or containers is stored only once, leading to substantial space savings and allowing for more frequent backups without excessive storage consumption.
Setting up Datastore in Proxmox Backup Server
- Login to PBS
- Under Datastore click Create Datastore
- Name: Choose name to call it
- Backup Path: Select the path to folder directory on the machine. If not using volume from machine check out this article to use NAS storage via NFS
- Under Prune option this is personal preference, but deduplication really lowers the amount of space needed, so keeping more backups is not bad decision.
- Once done click Add
When the datastore is added, clicking on datastore will give you info, and also ability to adjust Prune and CG Jobs. Also, under Verify Jobs it's good idea to add Verify Job for checking that backup isn't corrupted and that will work when needed.
- Under Prune & CG Jobs make sure CG Job is set to daily. You can adjust Prune job here as well
- Under Verify Job click Add and schedule Verify to run Daily and Re-Verify to run every 30 days
It is optional to create a namespace. Storing your backups in separate namespaces is very useful if you ever plan on planning to use your PBS to store backups from multiple Proxmox hosts, or even other Linux server.
-
Under Content click Add Namespace
- Parent Namespace: This would be folder in which this subfolder will live, usually root
- Namespace Name: name of the folder where backups will live
Adding PBS Database on PVE instance
- Select Datacenter > Storage > Add > Proxmox Backup Server
- Set the parameters to match the information below:
- ID: the name you’d like to use (I use pbs-backups)
- Server: IP address of Proxmox Backup Server
- Username: bservice@pbs (use user made specifically for pbs to pve connection).
- Password: Password of the user
- Datastore: Name of the datastore you created in PBS
- Namespace: if you have namespace add it here
- Fingerprint: hash from PBS server. Paste the fingerprint copied from the PBS dashboard
- Add Database


Add a Backup Job in PVE
- Login back to Proxmox Virtual Environment
- Select Datacenter then Backup, then select Add
- Under General
- Select PBS Storage
- Schedule put a time that works best
- Selection Mode: best to do All
- Mode: Stapshot is the most reliable for daily backup. Stop can be run once a week
- Retention
- This is configured on PBS side
- Under General
- Click OK to schedule the backup

Backing up Proxmox Virtual Environment to Synology NAS
This article goes trough setting up NFS connection between Synology and PVE Database. Although using Proxmox Backup Server is better for keeping more backups using deduplication, verification and pruning options, having additional backup job directly from PVE instance can increase redundancy in case of PBS failure.
Having Proxmox Virtual Environment and Synology NAS up and running are pre requisite for this setup.
Setting up NFS connection on Synology
- Open the Control Panel on Synology DSM and select File Services then NFS
- Select Enable NFS service and then Apply. (NFSv3 is still a safe, but selecting latest protocol is always a good idea)


Make sure Synology Firewall is configured to allow Proxmox IP address to access Synology via NFS. Also, on Unifi router settings ensure that there is a rule set to allow access.
Proxmox Storage Configuration
- Login to Proxmox Virtual Environment
- Select Datacenter then Storage
- Select Add then NFS

- At the NFS screen
- Create an ID
- IP Address of your Synology NAS server
- In the Export drop-down menu, the location of your Proxmox folder should automatically appear (If not, there is problem with Synology Firewall or Router Firewall)
- In the Content drop-down, select ALL entries. You can then select Add

Proxmox should now show the Synology NAS Storage that we created above
Setting up Backup Job
We can now backup individual machines or create a backup job
- Under Datacenter go to Backups
- Select Add button
- In Backup Job window under General
- Keep Node to All
- Storage: Select NFS storage we configured
- Schedule: Pick date that works best for you
- Selection Mode: Either select all or manually choose which VMs and LXCs to run backup for
- Mode: Snapshot for daily backup, Suspend or Stop for weekly (make sure that your applications are set to automatically start at reboot)
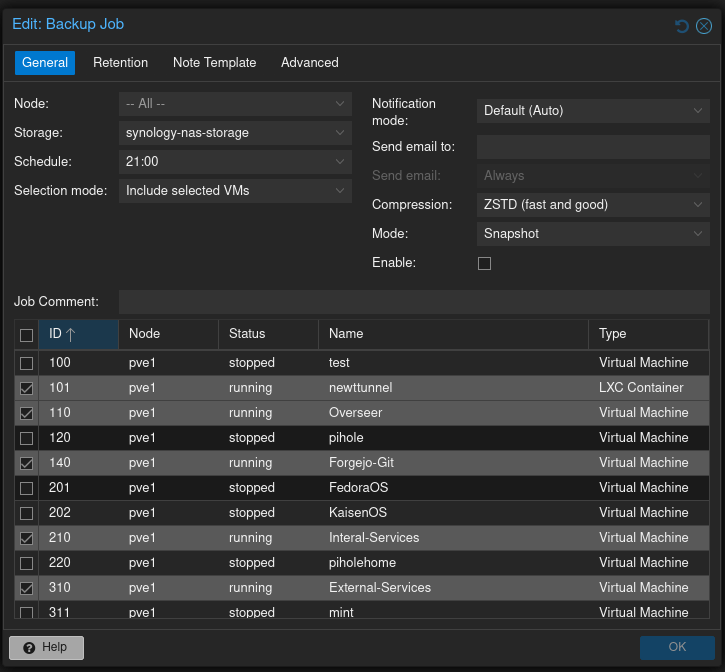
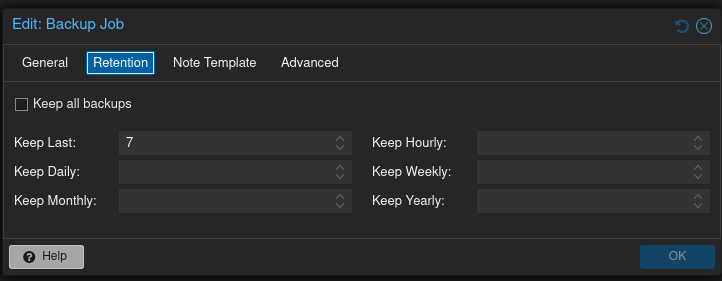
- In Backup Job window under Retention
- Set retention that best works for you, depending on the storage size allocated
How to install Proxmox Backup Client
This guide explains how to install and use Proxmox Backup Client on a Debian VM. This would allow non proxmox machine to be backed up using PBS.
Proxmox Backup Client Documentation
Proxmox Installaton for Proxmox Backup Client Documentation
Installing Proxmox Backup Client
- Add the repository
- In order to configure this repository you need to first setup the Proxmox release key
Please note that this installation is for Debian 12 (Bookworm). If you are on a newer version, use this guide a reference with the updated command on: https://pbs.proxmox.com/docs/installation.html#package-repositories-client-only-apt
sudo wget https://enterprise.proxmox.com/debian/proxmox-release-bookworm.gpg -O /etc/apt/trusted.gpg.d/proxmox-release-bookworm.gpgsudo nano /etc/apt/sources.list.d/pbs-client.list- add the line
deb http://download.proxmox.com/debian/pbs-client bookworm main- Install Proxmox Backup Client
sudo apt updatesudo apt install proxmox-backup-clientproxmox-backup-client versionConfigure Proxmox Backup Client
First backup
sudo proxmox-backup-client backup "backupname".pxar:"directory" --repository "backupuser"@pbs@"PBS-IP":"DataStoreName" -ns "YourNameSpace"Example:
sudo proxmox-backup-client backup mkdocsbackup.pxar:/home/user/docker --repository ardougneBackupUser@pbs@100.102.226.112:HDD-storage-5Tb -ns azure_mkdocsList all backups
proxmox-backup-client list --repository "backupuser"@pbs@"PBS-IP":"DataStoreName" -ns "YourNameSpace"example:
proxmox-backup-client list --repository ardougneBackupUser@pbs@100.102.236.112:HDD-storage-5Tb -ns azure_mkdocsBackup encryption
proxmox-backup-client key create /home/user/encryption.keyFill in your desired key
Storing credentials
This is so that you do not need to enter credentials for each backups.
-
Environment variables: is an option, but credentials are stored in plain text.
-
Systemd credentials: are stored as encrypted files that only systemd decrypts when launching a service. We will be using systmd credentials for this guide.
To store the password of the backup user:
sudo systemd-ask-password -n | systemd-creds encrypt --name=proxmox-backup-client.password - /your/password/directory/password.credTo store the encryption key we created:
systemd-ask-password -n | sudo systemd-creds encrypt --name=proxmox-backup-client.encryption-password - /home/user/encryption-password.credLet's create a systemd service:
sudo nano /etc/systemd/system/backup.servicePaste in the following (fill in your own details and remove the quotes):
[Unit]
Description=Proxmox Backup Client service
Wants=network-online.target
After=network-online.target

[Service]
Type=oneshot
ExecStart=proxmox-backup-client backup "backupname".pxar:/home/user/docker \
  --repository "backupuser"@pbs@"PBS-IP":"DataStoreName" \
  -ns "YourNameSpace" \
  --keyfile /home/user/encryption.key
LoadCredentialEncrypted=proxmox-backup-client.password:/home/user/password.cred
LoadCredentialEncrypted=proxmox-backup-client.encryption-password:/home/user/encryption-password.cred

[Install]
WantedBy=multi-user.target
Reload systemd so it picks up the service
sudo systemctl daemon-reloadTest it:
sudo systemctl start backup.serviceSchedule a backup
To start a backup at a certain time
sudo nano /etc/systemd/system/backup.timer[Unit]
Description=Run backup daily at 2am
[Timer]
OnCalendar=*-*-* 02:00:00
Persistent=true
[Install]
WantedBy=timers.targetsudo systemctl daemon-reloadsudo systemctl enable --now mkdocs-backup.timerRestore a backup
First list all your backups:
sudo proxmox-backup-client snapshot list "backupname".pxar:"directory" --repository "backupuser"@pbs@"PBS-IP":"DataStoreName" -ns "YourNameSpace"To restore a backup:
proxmox-backup-client restore host/"YourHostname"/2025-08-09T15:51:02Z "backupname".pxar /where/to/restore --repository "backupuser"@pbs@"PBS-IP":"DataStoreName" -ns "YourNameSpace"