Installation Guides for Software and Services
Documentation on standing up homelab software's
- BookStack
- Authentik
- Authentik Docker Compose Install
- Authentik Passwordless Login
- Authentik OAuth/ OIDC Setup - Portainer
- Authentik OAuth/ OIDC Setup - Home Assistnat
- Pangolin
- Homarr Homepage
- Dockpeek
- Dockge
- Synology
- Komodo
- Proxmox
- Gotify
- UxPlay
- MeshCentral
- Docker
- Dockhand
- Connecting Server Directory to Synology NAS (NFS Setup)
BookStack
Installation Guide for Internal Services
BookStack Installation Guide
This Guide goes trough steps necessary for creating a good well organized step by step process. This guide walks you through deploying BookStack using Docker and Docker Compose, with a working configuration that includes MariaDB, proper environment variables, and SSL disabled for local development.
BoookStack Installation Documentation
Prerequisites
- Docker and Docker Compose installed
- Portainer or terminal access
Steps
These steps are for terminal access
- Create Project Directory
mkdir ~/bookstack-docker
cd ~/bookstack-docker- Generate Larvel app Key
docker run -it --rm --entrypoint /bin/bash lscr.io/linuxserver/bookstack:latest appkey- Create docker-compose.yml
- Change 'supersecurepassword' with unique password. Make sure they match for both environments
version: '3.8'

services:
  bookstack:
    image: lscr.io/linuxserver/bookstack:latest
    container_name: bookstack
    environment:
      - PUID=1000
      - PGID=1000
      - TZ=Etc/UTC
      - APP_URL=http://localhost:6875
      - DB_HOST=bookstack_db
      - DB_PORT=3306
      - DB_USERNAME=bookstack_user
      - DB_PASSWORD=supersecurepassword
      - DB_DATABASE=bookstack
      - APP_KEY=base64:YOUR_GENERATED_KEY_HERE
    volumes:
      - bookstack_config:/config
    ports:
      - 6875:80
    depends_on:
      - bookstack_db
    restart: unless-stopped

  bookstack_db:
    image: mariadb:10.5
    container_name: bookstack_db
    command: --ssl=OFF
    environment:
      - MYSQL_ROOT_PASSWORD=rootpassword
      - MYSQL_DATABASE=bookstack
      - MYSQL_USER=bookstack_user
      - MYSQL_PASSWORD=supersecurepassword
    volumes:
      - ./bookstack/db:/var/lib/mysql
    restart: unless-stopped

volumes:
  bookstack_config:
- Start the Stack
docker-compose up -d- This will create containers, initialize the database, run Larvel migrations and serve BookStack on port 6875
- Check Logs
- This will check if the bookstack started correctly. You should see Larvel migrations completing and no errors about SSL or DB access
docker logs bookstack- Inspect App Files
- You should see Laravel files like
artisan,routes/,app/, etc.
- You should see Laravel files like
docker exec -it bookstack /bin/bash
ls /app/www- Create Admin User
- Once completed and app is running properly, creating a local user with strong password is great way. Do this inside container
docker exec -it bookstack /bin/bash
cd /app/www
php artisan bookstack:create-admin
Optional Enhancements
- Presistent uploads/themes
volumes:
  - ./bookstack/uploads:/config/www/uploads
  - ./bookstack/themes:/config/www/themes
Authentik
Identity Provider self hosted on Internal Services VM
Authentik Docker Compose Install
Authentik is an open-source Identity Provider (IdP) that helps you manage authentication and authorization across your apps and infrastructure. It supports:
- Single Sign-On (SSO) via OAuth2, OpenID Connect, SAML
- LDAP & SCIM integration
- Multi-factor authentication
- Reverse proxy for seamless app protection
Think of it as your self-hosted alternative to services like Okta or Auth0, but with full control and flexibility.
Prerequisites:
- Docker & Docker Compose
Authentik Docker Compose Installation Guide
Install Steps:
- Open SSH and get to the device you want to run it on. (my case Overseer)
- grab preconfigured yml
wget https://goauthentik.io/docker-compose.ymlIf this is a fresh authentik installation, you need to generate a password and a secret key.
- Run the following commands to generate a password and secret key and write them to your
.envfile:
echo "PG_PASS=$(openssl rand -base64 36 | tr -d '\n')" >> .env
echo "AUTHENTIK_SECRET_KEY=$(openssl rand -base64 60 | tr -d '\n')" >> .env- To enable error reporting, run the following command:
echo "AUTHENTIK_ERROR_REPORTING__ENABLED=true" >> .env- By default, authentik listens internally on port 9000 for HTTP and 9443 for HTTPS.
cd /docker/authentik/.env- To change the exposed ports to 80 and 443, you can set the following variables in
.env:
COMPOSE_PORT_HTTP=80
COMPOSE_PORT_HTTPS=443- Startup docker compose
docker compose pull
docker compose up -d
To start the initial setup, navigate to http://<your server's IP or hostname>:9000/if/flow/initial-setup/
Alternative Install Steps:
- Open SSH and get to the device you want to run it on. (my case Overseer)
- Create Directory
mkdir /docker/authentik
cd /docker/authentik- Create docker-compose.yml and edit it
nano docker-compose.yml #might need to use sudo if it doesn't give you accessversion: '3.8'
services:
postgresql:
image: postgres:15
environment:
POSTGRES_DB: authentik
POSTGRES_USER: authentik
POSTGRES_PASSWORD: authentik
volumes:
- postgresql_data:/var/lib/postgresql/data
redis:
image: redis:7
volumes:
- redis_data:/data
server:
image: ghcr.io/goauthentik/server:latest
depends_on:
- postgresql
- redis
environment:
AUTHENTIK_SECRET_KEY: "supersecretkey"
AUTHENTIK_POSTGRESQL__HOST: postgresql
AUTHENTIK_POSTGRESQL__USER: authentik
AUTHENTIK_POSTGRESQL__PASSWORD: authentik
AUTHENTIK_POSTGRESQL__NAME: authentik
AUTHENTIK_REDIS__HOST: redis
ports:
- "8080:8000" # Web UI
- "9444:9443" # Proxy port
volumes:
- authentik_media:/media
- authentik_static:/static
worker:
image: ghcr.io/goauthentik/worker:latest
depends_on:
- server
environment:
AUTHENTIK_SECRET_KEY: "supersecretkey"
AUTHENTIK_POSTGRESQL__HOST: postgresql
AUTHENTIK_POSTGRESQL__USER: authentik
AUTHENTIK_POSTGRESQL__PASSWORD: authentik
AUTHENTIK_POSTGRESQL__NAME: authentik
AUTHENTIK_REDIS__HOST: redis
volumes:
- authentik_media:/media
- /var/run/docker.sock:/var/run/docker.sock
volumes:
postgresql_data:
redis_data:
authentik_media:
authentik_static:
- Create the .env file
nano .env #might need to run it with sudo# Database credentials
PG_USER=authentik
PG_PASS=supersecurepassword123
PG_DB=authentik
# Authentik image tag
AUTHENTIK_IMAGE=ghcr.io/goauthentik/server
AUTHENTIK_TAG=2025.6
# Optional: HTTP/HTTPS ports (not forwarded externally)
COMPOSE_PORT_HTTP=9000
COMPOSE_PORT_HTTPS=9444
# Secret Key
AUTHENTIK_SECRET_KEY=your-super-secret-key- Start the stack
docker-compose up -dOnce the stack is up, everything is finished installing you can check it with
docker-compose psTo start the initial setup, navigate to http://<your server's IP or hostname>:9000/if/flow/initial-setup/.
Authentik Passwordless Login
Passwordless Login in Authentik allows us to login using passkey instead of password. This option provides higher security and faster authentication.
At the moment Passwordless Authentication only supposts WebAuth devicees (tokens, yubkey, 1password passkey).
Authentik Documentation on Passwordless Login
Steps to Set Up Passwordless Login Flow
- Login to Authentik as Administrator
- Click on Flows and Stages and click on Flows
- Click Create
- Keep the name similar across the process for easier setup
- For Designation choose Authentication
- Click on new created Flow
- Click on Stage Bindings and choose Create & Bind Stage
- Choose Authenticator Validation Stage
- Click Next and add name similar to previous one
- Choose WebAuthn Authentication
- For not configured action choose Force the user to configure an authenticator
- For configuration stage find default-autenticator-webauth-setup and push over to the right
- Click Next and Finish
- Click Bind existing Stage
- For Stage select default-authentication-login (or personal one)
- If you add Order number for previous part, add a higher number
- Click Create
- Go back to Flows and select your Welcome Page or defaulth-authentication-flow
- Go to Stage Bindings and for Identification Stage click Edit Stage
- Go to flow Settings
- Select passwordless flow
You should be ready to go
Authentik OAuth/ OIDC Setup - Portainer
Authentik uses many ways to connect to services, one being OAuth or Open ID Connect. This method is widely used on many services, such as Portainer.
Please follow Authentik and Portainer documentation
Authentik OAuth:
- Login to Authentik Admin Interface
- Go to Applications and select Create with Provider
- Choose a name and group
- Under URI in Launch URL enter https://portainer.cyberpaw.org
- Choose Oauth2 Provider
- Name the provider same as application
- For Authorization Flow choose Cyberpaw-authorization-flow (or default one)
- Make sure Confidential is selected for Client Type
- Copy Client ID and Client Key
- In Redirect URIs enter https://portainer.cyberpaw.org (check portainer instructions for more detail)
- For Encryption key choose default-authentic-self-signed-certificate
- Under Advanced flow settings choose Welcome to Authentick (or default one)
- Under Configure Bindings click Bind existing policy/group/users
- Select Group and choose existing group that is authorized to use this service
- Review and Submit
- The provider is created and should say it's connected to application
Portainer Steps:
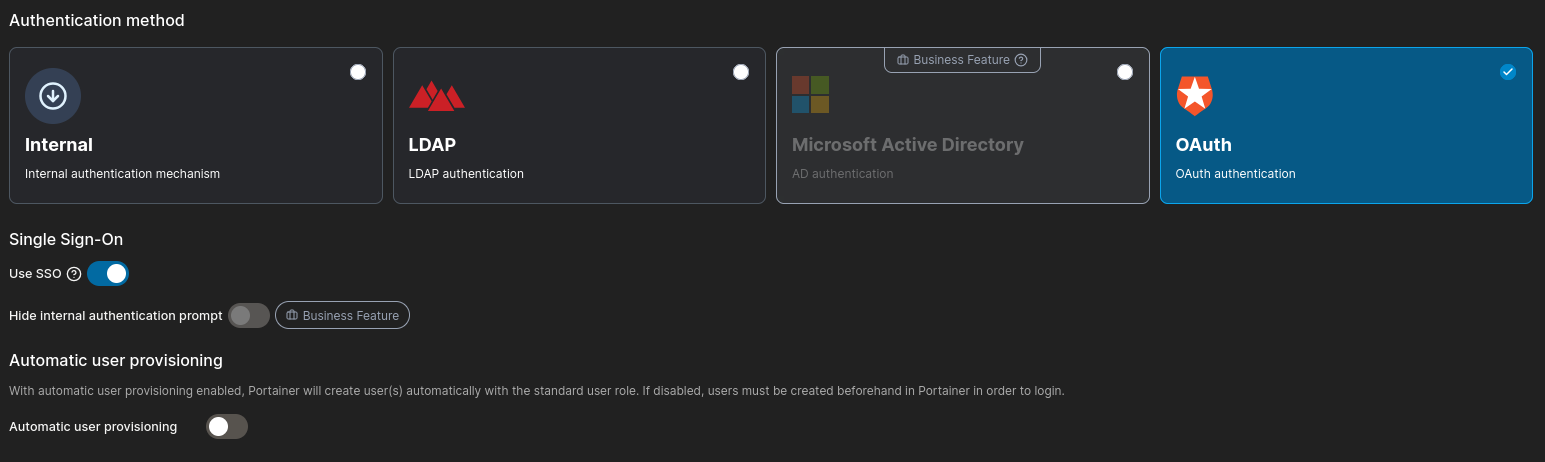
- Choose Automatic User Provisioning allowing other Authentik users that don't have Portainer user can login
- If not selected you will need to create an account with same email as Authentik user
- Scroll down to OAuth Configuration
- Copy and Paste all the field ID, secret and URLs from Provider information in Authentik
- Go back to Authentik Admin Interface
- Lower Application Section and click Providers
- Click on Portainer Provider and copy all the required information to Portainers OAuth Configuration
- For User Identification type "email"
- For Scope type "email oauth provider" -Portainer documentation says to use dashes but use space instead
- Save
- Copy and Paste all the field ID, secret and URLs from Provider information in Authentik
- Logout and you should see Login with OAuth button
Authentik OAuth/ OIDC Setup - Home Assistnat
Authentik uses many ways to connect to services, one being OAuth or Open ID Connect. This method is widely used on many services, such as Home Assistant. Home Assistant doesn't have native Open ID Connection, so we will need to use HACS for setup
Please follow Authentik and Portainer documentation
Authentik OAuth:
- Login to Authentik Admin Interface
- Go to Applications and select Create with Provider
- Choose a name and group
- Under URI in Launch URL enter https://portainer.cyberpaw.org
- Choose Oauth2 Provider
- Name the provider same as application
- For Authorization Flow choose Cyberpaw-authorization-flow (or default one)
- Make sure Confidential is selected for Client Type
- Copy Client ID and Client Key
- In Redirect URIs enter http://overseer.cyberpaw.org:8123/auth/openid/callback
- For Encryption key choose default-authentic-self-signed-certificate
- Under Advanced flow settings choose Welcome to Authentick (or default one)
- Under Configure Bindings click Bind existing policy/group/users
- Select Group and choose existing group that is authorized to use this service
- Review and Submit
- The provider is created and should say it's connected to application
Home Assistant Steps:
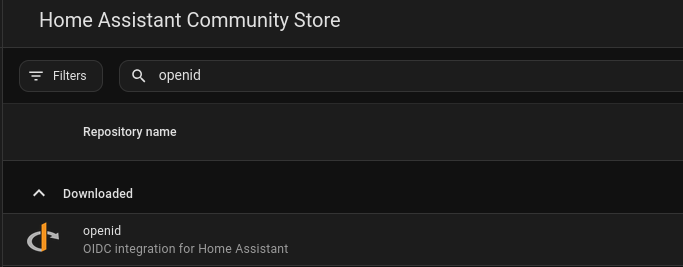
- Login to Home Assistant with Admin
- Open HACS
- Search for hass-openid
- Go to Terminal app on HA
- Navigate to Your Home Assistant Config Directory
cd /config- Create custom_components Directory
mkdir -p /config/custom_components/openid- Download the Files from GitHub
git clone https://github.com/cavefire/hass-openid.git
cp -r hass-openid/custom_components/openid /config/custom_components/- Restart Home Assistant
- Go back to Terminal and add following configuration to configuration.yaml file
  #OAuth with Authentik
openid:
  client_id: YOUR_CLIENT_ID
  client_secret: YOUR_CLIENT_SECRET
  configure_url: "https://auth.cyberpaw.org/application/o/home-assistant/.well-known/openid-configuration"  # Replace with your Identity Provider's URL
  username_field: "email"  # Adjust based on your IdP's user info response
  scope: "openid profile email"
  block_login: false
openid_text: "Login with Authentik" # Text to display on the login page- Restart Home Assistant
If you want to disable the default Home Assistant login and only allow OpenID authentication, set block_login to true in your configuration
Pangolin
Pangolin Install and Setup Guide
Pangolin Install Guide
Pangolin is
Most of the guide is from their doc page, however, there is a part missing for making proxy redirect work properly.
Pangolin Install Guide
This will resolve an issue of https://pangolin.cyberpaw.org/auth/initial-setup site not being reachable, or getting Invalid ssl cert error.
- Login trough SSH to VPS server that is preset with necessary security steps
- Download the installer
curl -fsSL https://digpangolin.com/get-installer.sh | bash- Run the installer
sudo ./installer- Once installer is finished Configure basic Settings from prompts. The installer will prompt you for essential configuration:
- Base Domain: Enter your root domain without subdomains (e.g., example.com)
- Dashboard Domain: Press Enter to accept the default pangolin.example.com or enter a custom domain
- Let’s Encrypt Email: Provide an email for SSL certificates and admin login
- Tunneling: Choose whether to install Gerbil for tunneled connections (default: yes). You can run Pangolin without tunneling. It will function as a standard reverse proxy.
- Email Configuration: Say no, if you don't have SMTP server set up
- CrowdSec: say Yes to install and self manager CrowdSec
- Once installer is ready try to go to:
https://pangolin.example.com/auth/initial-setupIf you get Invalid SSL Certificate error or Site can't be reached continue with steps below
Traefik dynamic_config.yml Change
cd /config/traefik- Backup existing file
cp dynamic_config.yml dynamic_config.yml.bak- Edit yml
nano dynamic_config.yml- Add new line in router part
    setup-router:
      rule: "Host(`pangolin.cyberpaw.org`) && PathPrefix(`/auth`)"
      service: api-service
      entryPoints:
        - websecure
      tls:
certResolver: letsencrypt- Save and Exit
- Restart traefik container
docker restart <traefik_container_name>Now try to go to initial setup and follow initial steps.
Post Install ACME Falining Fix
This guide walks you through the exact steps to diagnose and fix ACME certificate issues during a Pangolin installation. These steps cover the most common real‑world causes: DNS mismatches, blocked ports, Traefik misconfiguration, and redirect loops. Follow the checklist in order—each step rules out a specific failure point so you can quickly identify what’s wrong and get ACME issuing certificates again.
Troubleshoot Steps
Verify DNS is pointing to the correct server
ACME will always fail if DNS points to the wrong IP.
-
A yourdomain.com → <your VPS IP> -
A *.yourdomain.com → <your VPS IP>
- Check your server’s public IP and make sure it matches your DNS records
curl ifconfig.meTest port 80 from outside the server
ACME HTTP‑01 requires port 80 to be reachable publicly.
- From your laptop or phone:
curl -I http://yourdomain.comInterpret the result:
-
200 / 301 / 404 → Port 80 is open (good)
-
Timeout → Firewall or provider is blocking port 80
-
Connection refused → Traefik is not listening on port 80
Check VPS firewall (UFW)
sudo ufw status80/tcp ALLOW
443/tcp ALLOWIf missing:
sudo ufw allow 80/tcp
sudo ufw allow 443/tcp
Check hosting provider firewall
For example Hetzner has an external firewall that overrides UFW
- Go to your VPS dashboard
- Server → Networking → Firewalls
TCP 80
TCP 443
If port 80 is missing → ACME will fail every time.
Confirm Traefik is listening on port 80
- SSH into server and run following command
sudo ss -tulpn | grep :80Expected:
docker-proxy ... LISTEN ... :80If nothing is listening → Traefik didn’t bind to port 80.
Disable HTTP→HTTPS redirect during ACME
This is the most common Traefik issue.
If Traefik redirects ACME requests to HTTPS before a certificate exists, ACME fails.
- SSH into the server, and go to dynamic-compose.yaml. Usually in config > traefik folder
main-app-router-redirect:
  entryPoints:
    - web
  middlewares:
- redirect-to-https- Temporarily comment out the redirect:
# - redirect-to-https- Restart Traefik:
sudo docker compose restart traefikEnsure ACME is using HTTP‑01 on the correct entrypoint
In traefik onfig yaml
httpChallenge:
  entryPoint: web
Entrypoints must be:
entryPoints:
  web:
    address: ":80"
  websecure:
    address: ":443"
Homarr Homepage
Dockpeek
Docker Monitoring Tool
Installing Dockpeek
Here is the guide to install and standup Dockpeek tool that will monitor all docker and docker images on a server and remote servers with additional agent install
Install Dockpeek
- SSH to Overseer machine, or get in trough Portainer/ Other GUI Compose Interface
- Run following docker compose
services:
  dockpeek:
    container_name: dockpeek
    image: ghcr.io/dockpeek/dockpeek:latest
    environment:
      - SECRET_KEY=my_secret_key #change this
      - USERNAME=admin #change this
      - PASSWORD=admin #change this
    ports:
      - "3420:8000" #change 3420 as necessary for your setup. do not change 8000.
    volumes:
      - /var/run/docker.sock:/var/run/docker.sock #this is how we connect to the docker-socket.
    restart: unless-stopped #this is fine.
Adjust environment info for secure login
Install Dockpeek Agents for Remote Clients
If you have multiple server running dockers on a local network
- Run following docker compose for installing agents
### Don't change anything here. Just deploy it as it is on the node/server you want to monitor
services:
  dockpeek-socket-proxy:
    image: lscr.io/linuxserver/socket-proxy:latest
    container_name: dockpeek-socket-proxy
    environment:
      - CONTAINERS=1
      - IMAGES=1
      - PING=1
      - VERSION=1
      - INFO=1
      - POST=1       # <-- This is needed for "Check for updates" operations
    volumes:
      - /var/run/docker.sock:/var/run/docker.sock:ro
    read_only: true
    tmpfs:
      - /run
    ports:
      - "2375:2375"
restart: unless-stopped- Once all agents are installed adjust main Dockpeek compose file by adding additional variables under environment
services:
  dockpeek:
    container_name: dockpeek
    image: ghcr.io/dockpeek/dockpeek:latest
    environment:
      - SECRET_KEY=my_secret_key #change this
      - USERNAME=admin #change this
      - PASSWORD=admin #change this

      # Docker Host 1 (This is our local server)
      - DOCKER_HOST_1_URL=unix:///var/run/docker.sock #this connects to the local docker socket.
      - DOCKER_HOST_1_NAME=LocalHost #this is the identifier that will show in the dashboard.
      - DOCKER_HOST_1_PUBLIC_HOSTNAME=192.168.0.18 #this is the IP address of the server (no http/https).

      # Docker Host 2 (This is a remote server on our local network)
      - DOCKER_HOST_2_URL=tcp://192.168.0.107:2375 #change the IP address to your remote server's IP address. Don't change anything else.
      - DOCKER_HOST_2_NAME=OpenCloud #this is the identifier that will show in the dashboard.
      - DOCKER_HOST_2_PUBLIC_HOSTNAME=192.168.0.107 #this is the IP address of the server (no http/https).

      # Docker Host 3 (This is a remote server on our local network)
      - DOCKER_HOST_3_URL=tcp://192.168.0.108:2375 #change the IP address to your remote server's IP address. Don't change anything else.
      - DOCKER_HOST_3_NAME=ClosedCloud #this is the identifier that will show in the dashboard.
      - DOCKER_HOST_3_PUBLIC_HOSTNAME=192.168.0.108 #this is the IP address of the server (no http/https).

      # Keep adding more hosts as necessary. Be sure to increase the number of the Docker Host.

    ports:
      - "3420:8000" #change 3420 as necessary for your setup. do not change 8000.
    volumes:
      - /var/run/docker.sock:/var/run/docker.sock #this is how we connect to the docker-socket.
    restart: unless-stopped #this is fine.
Dockge
Docker Compose Management Tool
Synology
Installs in Synology NAS
NUT in Synology
This guide goes trough how to connect and enable NUT Server for UPS with Synology. Assuming that there is connected ups system to synology NAS
Synology Setup
- Login to Synology DSM
- Go to Control Panel
- Under Hardware & Power go to UPS
- Enable UPS Support
- Check Until Low Battery- as time can vary
- Enable network UPS server
- Under Premitted DiskStation Devices enter IP address of devices that need access to NUT Server
Home Assistant Setup
- Go to Home Assistant
- Go to Settings
- Click on Devices & Services
- Click Add Integration
- Search for NUT Network UPS Tools
- Add IP of Synology NAS
- leave rest blank
Komodo
Install Komodo Periphery Agents
This document goes over setting up agents for connecting to Core Komodo. When making initial docker compose in the .env file we will define the password that will go into this docker-compose.yml file under line 18.
- SSH to server you want to establish connection with
- In the desired folder path paste following docker-compose.yml
####################################
# 🦎 KOMODO COMPOSE - PERIPHERY 🦎 #
####################################

## This compose file will deploy:
##   1. Komodo Periphery

services:
  periphery:
    image: ghcr.io/moghtech/komodo-periphery:${COMPOSE_KOMODO_IMAGE_TAG:-latest}
    labels:
      komodo.skip: # Prevent Komodo from stopping with StopAllContainers
    restart: unless-stopped
    ## https://komo.do/docs/connect-servers#configuration
    environment:
      PERIPHERY_ROOT_DIRECTORY: ${PERIPHERY_ROOT_DIRECTORY:-/etc/komodo}
      ## Pass the same passkey as used by the Komodo Core connecting to this Periphery agent.
      PERIPHERY_PASSKEYS: XXXXXXXXXXXX
      ## Make server run over https
      PERIPHERY_SSL_ENABLED: true
      ## Specify whether to disable the terminals feature
      ## and disallow remote shell access (inside the Periphery container).
      PERIPHERY_DISABLE_TERMINALS: false
      ## If the disk size is overreporting, can use one of these to
      ## whitelist / blacklist the disks to filter them, whichever is easier.
      ## Accepts comma separated list of paths.
      ## Usually whitelisting just /etc/hostname gives correct size for single root disk.
      PERIPHERY_INCLUDE_DISK_MOUNTS: /etc/hostname
      # PERIPHERY_EXCLUDE_DISK_MOUNTS: /snap,/etc/repos
    volumes:
      ## Mount external docker socket
      - /var/run/docker.sock:/var/run/docker.sock
      ## Allow Periphery to see processes outside of container
      - /proc:/proc
      ## Specify the Periphery agent root directory.
      ## Must be the same inside and outside the container,
      ## or docker will get confused. See https://github.com/moghtech/komodo/discussions/180.
      ## Default: /etc/komodo.
      - ${PERIPHERY_ROOT_DIRECTORY:-/etc/komodo}:${PERIPHERY_ROOT_DIRECTORY:-/etc/komodo}
    ## If periphery is being run remote from the core server, ports need to be exposed
    ports:
     - 8120:8120
    ## If you want to use a custom periphery config file, use command to pass it to periphery.
# command: periphery --config-path ${PERIPHERY_ROOT_DIRECTORY:-/etc/komodo}/periphery.config.toml- Start the docker compose
sudo docker compose up -dProxmox
Proxmox Installation guides
Installing Proxmox Backup Server
This article goes over steps for installing Proxmox Backup Server. There is multiple options on where to run PBS instance, however for best performance running it on seperate bare metal machine would be the best option. PBS can run in virtual machine if needed, just like any other OS with ISO image. If PBS runs in vm do not select that vm when scheduling backup job with PBS.
Prerequisite is machine ready and Proxmox Backup Server ISO flashed to flash drive
Installing PBS
- Boot the machine and select flash drive with ISO image
- Install PBS with a graphical user interface

- Accept EULA
- Select Target Disk to where OS will live (Hopefully separate from main storage if you have couple)
- Fill in your country, timezone and keyboard layout
- Choose a unique password and fill in your email address for your root access (you can disable root later)
-
Fill in your network details
-
ID: A name for the connection, e.g., pbs-backup
-
Managment Interface: unless you want/have a different interface, leave this as default
-
Hostname: "NameOfYourPBS":local
-
IP Address: Choose a static IP address
-
Gateway: Fill in the gateway
-
DNS server: Fill in a DNS server
-
- Finish the installation by clicking continue
- Access the PBS Dashboard by going to its [IP Address] and pot 8007 eg. https://192.168.1.101:8007
Gotify
Installing Gotify with iGotify for iOS
Gotify is a self-hosted notification server that lets you send messages to devices and apps via a simple API. It’s great for server alerts, home automation, and custom scripts because you control delivery and history.
iGotify is the bridge that makes Gotify work with iOS push notifications. It listens to Gotify, translates messages, and forwards them to the SecNtfy app on your iPhone so you get real push alerts (iOS can’t poll in the background, so the bridge is required).
Once app is installed Set gotify and igotify domain in Nginx Reverse Proxy and Pangolin for domain with ssl login
Install Gotify
- ssh to folder where gotify app will live or use Komodo and create Stack
- Add docker-compose.yaml
- Add services: Gotify and iGotify, with ports exposed (e.g., Gotify 3030:80, iGotify 3031:8080)
- Persist data: Use a volume for Gotify (data:/app/data or ./gotify_data:/app/data)
- GOTIFY_DEFAULTUSER_PASS for the default admin
- Start the stack
- Check URLs: Gotify at http://<server-ip>:3030, iGotify at http://<server-ip>:3031/Version
- Login: Open Gotify, sign in as admin
Create Tokens for iOS app
- Login to Gotify in browser and got to Clients
- Create a Gotify client token by clicking New client (e.g., “igotify”).
- Copy token
- Add to iGotify env: GOTIFY_CLIENT_TOKENS: "cXXXXXXXX" inside yml file
- Adjust the URL to the domain url of Gotify
iGotify iOS App Setup
- Install iGotify app
- Enable local instance: In the app’s settings
- Connect to iGotify: Use http://<server-ip>:3031
- Get igotify app token: In the app, Settings → Development → copy the notification token (NTFY-DEVICE-XXXXXX).
- Add that token to the yml file
- Update compose
- Once everything is up and running, go to igotify app into settings
- Select Instance and click Edit
- Change the http://<server-ip>:3031 to https and point it to domain
Adding multiple devices Multiple tokens
Add each device’s SecNtfy token separated by semicolons.
Example:
Enviroment:
  SECNTFY_TOKENS: "NTFY-DEVICE-AAA;NTFY-DEVICE-BBB"
  GOTIFY_CLIENT_TOKENS: "cXXXX1;cXXXX2" (if using multiple Gotify clients)
  GOTIFY_URLS: "https://gotify1;https://gotify2" (if using multiple Gotify servers)
Gotify Compose File
services:
  gotify:
    container_name: gotify
    hostname: gotify
    image: gotify/server
    restart: unless-stopped
    security_opt:
      - no-new-privileges:true
    networks:
      - net
    ports:
      - "3030:80"
    volumes:
      - data:/app/data
    environment:
      GOTIFY_DEFAULTUSER_PASS:  'admin'   # Change me!!!!!

  igotify:
    container_name: igotify
    hostname: igotify
    image: ghcr.io/androidseb25/igotify-notification-assist:latest
    restart: unless-stopped
    security_opt:
      - no-new-privileges:true
    pull_policy: always
    healthcheck:
      test: [ "CMD", "curl", "-f", "http://localhost:8080/Version" ]
      interval: "3s"
      timeout: "3s"
      retries: 5
    networks:
      - net
    ports:
      - "3031:8080"
    volumes:
      - api-data:/app/data
    environment:                 # option environment see above note
      GOTIFY_URLS:          'https://gotify.cyberpaw.org'
      GOTIFY_CLIENT_TOKENS: '' #create on the gotify browser client
      SECNTFY_TOKENS:       '' #after initial login get it from settings

networks:
  net:

volumes:
  data:
  api-data:
UxPlay
Installing UxPlay on Linux
This guide explains how to:
-
Install UxPlay on Fedora
-
Create a launch script
-
Create a .desktop launcher so UxPlay appears in the Apps menu
-
Run UxPlay in the background without freezing the launcher
Install UxPlay and create Launch Script
- Open Terminal and run
sudo dnf install uxplay- Create a folder for custom scripts. Fedora doesn’t always include a ~/bin folder by default, so create it:
mkdir -p ~/bin- Create UxPlay script
nano ~/bin/start-uxplay.shIn nano add
#!/bin/bash
nohup uxplay >/dev/null 2>&1 &- Save and Exit
- Make it executable
chmod +x ~/bin/start-uxplay.shCreate desktop app launcher
- Create Directory
mkdir -p ~/.local/share/applications- Create a launcher
nano ~/.local/share/applications/uxplay.desktopIn nano add
[Desktop Entry]
Type=Application
Name=UxPlay
Comment=Start the UxPlay AirPlay receiver
Exec=/home/YOURUSERNAME/bin/start-uxplay.sh
Icon=video-display
Terminal=false
Categories=AudioVideo;- Save and Exit
- Make launcher executable
chmod +x ~/.local/share/applications/uxplay.desktop- Refresh application database
update-desktop-database ~/.local/share/applications/To Stop UxPlay simply run command in terminal
pkill uxplayRun UxPlay as a systemd service
This method gives you:
-
systemctl start uxplay
-
systemctl stop uxplay
-
systemctl restart uxplay
-
Optional auto‑start on boot
-
Clean background operation with no terminal needed
Create a systemd service file
- Open Service file
sudo nano /etc/systemd/system/uxplay.serviceIn Nano Paste following command editing yoursuername
[Unit]
Description=UxPlay AirPlay Receiver
After=network.target

[Service]
Type=simple
User=YOURUSERNAME
ExecStart=/usr/bin/uxplay
Restart=on-failure

[Install]
WantedBy=multi-user.target- Reload systemd
sudo systemctl daemon-reloadOptional: Enable auto start on boot
sudo systemctl enable uxplay
Systemd Commands for UxPlay
- Start
sudo systemctl start uxplay- Stop
sudo systemctl stop uxplay
sudo systemctl stop uxplay
MeshCentral
MeshCentral Installation on Ubuntu Server
These Instructions follow the steps of starting personal MeshCentral remote support server. Prerequisites require you to have set up ubuntu server, and have DNS record set up to point to this ip:443. It's good idea to use cloudflare tunnel or other type of tunneling service so you don't need to do port forwarding.
Installing Steps for MeshCentral
- Update Server
sudo apt update && sudo apt upgrade -y- Install Node.js
curl -fsSL https://deb.nodesource.com/setup_20.x | sudo bash -
sudo apt install -y nodejs - Create MesCentral Directory
sudo mkdir /opt/meshcentral
cd /opt/meshcentral - Install MeshCentral
sudo npm install meshcentral - Create Dedicated User
sudo useradd -r -d /opt/meshcentral -s /sbin/nologin meshcentral
sudo chown -R meshcentral:meshcentral /opt/meshcentral - Grant Port 443 Access
sudo setcap 'cap_net_bind_service=+ep' $(which node) - Start MeshCentral
sudo -u meshcentral node node_modules/meshcentral - Configure for Port 443
sudo nano /opt/meshcentral/meshcentral-data/config.json Replace in json file:
{
  "settings": {
    "cert": "remote.cyberclaw.org",
    "port": 443,
    "redirPort": 80,
    "wanonly": true
  },
  "domains": {
    "": {
      "title": "My MeshCentral",
      "newAccounts": true
    }
  }
} - Create Systemd Service
sudo nano /etc/systemd/system/meshcentral.service Add:
[Unit]
Description=MeshCentral Server
After=network.target

[Service]
Type=simple
User=meshcentral
WorkingDirectory=/opt/meshcentral
ExecStart=/usr/bin/node node_modules/meshcentral
Restart=always
RestartSec=10

[Install]
WantedBy=multi-user.target - Enable and Start Service
sudo systemctl daemon-reload
sudo systemctl enable meshcentral.service --now
sudo systemctl status meshcentral.service
Login via domain set up for meshcentral. Go to create account. First Time account creation will be admin account.
Docker
Installing Docker
Steps for Installing Docker
- Add the Docker Repository
echo "deb [arch=$(dpkg --print-architecture) signed-by=/etc/apt/keyrings/docker.asc] https://download.docker.com/linux/ubuntu $(lsb_release -cs) stable" | sudo tee /etc/apt/sources.list.d/docker.list > /dev/null- Update Apt Repository
sudo apt update- Install Docker
sudo apt install docker-ce docker-ce-cli containerd.io- Verify Docker is running
sudo docker --version
sudo systemctl status docker
Dockhand
Dockhand Hawser Docker Compose Agent
To install Docker Compose Agent for Dockhand
version: '3.8'

services:
  hawser:
    image: ghcr.io/finsys/hawser:latest
    container_name: hawser
    volumes:
      - /var/run/docker.sock:/var/run/docker.sock
      - hawser_stacks:/data/stacks
    ports:
      - "2376:2376"
    environment:
      - TOKEN=your-secret-token
    restart: unless-stopped

volumes:
  hawser_stacks:
Connecting Server Directory to Synology NAS (NFS Setup)
This is a step-by-step document on how to connect a server directory to a Synology NAS using NFS. This guide assumes you have access to both the server and the Synology NAS.
Prerequisites
Access to a server (Linux-based).
Access to a Synology NAS.
NFS service enabled on the Synology NAS.
Sufficient permissions to execute commands on both devices.
Configure NFS on Synology NAS
- Access Synology NAS
- Enable NFS Service by Going to Control Panel > File Services
- Under the NFS tab, enable the NFS service
- Configure NFS Permissions:
- Navigate to Shared Folder in Control Panel
- Select the folder you want to share (e.g., /volume1/paperless-documents)
- Click on Edit > NFS Permissions
- Click Create and set the following:
- Hostname or IP: Enter the IP address of your server
- Privilege: Set to Read/Write
- Squash: Select No mapping to allow direct access
- Asynchronous: Optional, you can enable this for better performance
- Cross-Mount: Enable if you intend to mount cross-shared folders
- Check Allow users to access mounted subfolders
- Click OK to save the settings

Prepare Your Server
- SSH into your server
- Install NFS Client
sudo apt-get update
sudo apt-get install nfs-common- Create mount point- a directory where the NFS share will be mounted
sudo mkdir -p /mnt/nas/Import