Authentik
Identity Provider self hosted on Internal Services VM
- Authentik Docker Compose Install
- Authentik Passwordless Login
- Authentik OAuth/ OIDC Setup - Portainer
- Authentik OAuth/ OIDC Setup - Home Assistnat
Authentik Docker Compose Install
Authentik is an open-source Identity Provider (IdP) that helps you manage authentication and authorization across your apps and infrastructure. It supports:
- Single Sign-On (SSO) via OAuth2, OpenID Connect, SAML
- LDAP & SCIM integration
- Multi-factor authentication
- Reverse proxy for seamless app protection
Think of it as your self-hosted alternative to services like Okta or Auth0, but with full control and flexibility.
Prerequisites:
- Docker & Docker Compose
Authentik Docker Compose Installation Guide
Install Steps:
- Open SSH and get to the device you want to run it on. (my case Overseer)
- grab preconfigured yml
wget https://goauthentik.io/docker-compose.ymlIf this is a fresh authentik installation, you need to generate a password and a secret key.
- Run the following commands to generate a password and secret key and write them to your
.envfile:
echo "PG_PASS=$(openssl rand -base64 36 | tr -d '\n')" >> .env
echo "AUTHENTIK_SECRET_KEY=$(openssl rand -base64 60 | tr -d '\n')" >> .env- To enable error reporting, run the following command:
echo "AUTHENTIK_ERROR_REPORTING__ENABLED=true" >> .env- By default, authentik listens internally on port 9000 for HTTP and 9443 for HTTPS.
cd /docker/authentik/.env- To change the exposed ports to 80 and 443, you can set the following variables in
.env:
COMPOSE_PORT_HTTP=80
COMPOSE_PORT_HTTPS=443- Startup docker compose
docker compose pull
docker compose up -d
To start the initial setup, navigate to http://<your server's IP or hostname>:9000/if/flow/initial-setup/
Alternative Install Steps:
- Open SSH and get to the device you want to run it on. (my case Overseer)
- Create Directory
mkdir /docker/authentik
cd /docker/authentik- Create docker-compose.yml and edit it
nano docker-compose.yml #might need to use sudo if it doesn't give you accessversion: '3.8'
services:
postgresql:
image: postgres:15
environment:
POSTGRES_DB: authentik
POSTGRES_USER: authentik
POSTGRES_PASSWORD: authentik
volumes:
- postgresql_data:/var/lib/postgresql/data
redis:
image: redis:7
volumes:
- redis_data:/data
server:
image: ghcr.io/goauthentik/server:latest
depends_on:
- postgresql
- redis
environment:
AUTHENTIK_SECRET_KEY: "supersecretkey"
AUTHENTIK_POSTGRESQL__HOST: postgresql
AUTHENTIK_POSTGRESQL__USER: authentik
AUTHENTIK_POSTGRESQL__PASSWORD: authentik
AUTHENTIK_POSTGRESQL__NAME: authentik
AUTHENTIK_REDIS__HOST: redis
ports:
- "8080:8000" # Web UI
- "9444:9443" # Proxy port
volumes:
- authentik_media:/media
- authentik_static:/static
worker:
image: ghcr.io/goauthentik/worker:latest
depends_on:
- server
environment:
AUTHENTIK_SECRET_KEY: "supersecretkey"
AUTHENTIK_POSTGRESQL__HOST: postgresql
AUTHENTIK_POSTGRESQL__USER: authentik
AUTHENTIK_POSTGRESQL__PASSWORD: authentik
AUTHENTIK_POSTGRESQL__NAME: authentik
AUTHENTIK_REDIS__HOST: redis
volumes:
- authentik_media:/media
- /var/run/docker.sock:/var/run/docker.sock
volumes:
postgresql_data:
redis_data:
authentik_media:
authentik_static:
- Create the .env file
nano .env #might need to run it with sudo# Database credentials
PG_USER=authentik
PG_PASS=supersecurepassword123
PG_DB=authentik
# Authentik image tag
AUTHENTIK_IMAGE=ghcr.io/goauthentik/server
AUTHENTIK_TAG=2025.6
# Optional: HTTP/HTTPS ports (not forwarded externally)
COMPOSE_PORT_HTTP=9000
COMPOSE_PORT_HTTPS=9444
# Secret Key
AUTHENTIK_SECRET_KEY=your-super-secret-key- Start the stack
docker-compose up -dOnce the stack is up, everything is finished installing you can check it with
docker-compose psTo start the initial setup, navigate to http://<your server's IP or hostname>:9000/if/flow/initial-setup/.
Authentik Passwordless Login
Passwordless Login in Authentik allows us to login using passkey instead of password. This option provides higher security and faster authentication.
At the moment Passwordless Authentication only supposts WebAuth devicees (tokens, yubkey, 1password passkey).
Authentik Documentation on Passwordless Login
Steps to Set Up Passwordless Login Flow
- Login to Authentik as Administrator
- Click on Flows and Stages and click on Flows
- Click Create
- Keep the name similar across the process for easier setup
- For Designation choose Authentication
- Click on new created Flow
- Click on Stage Bindings and choose Create & Bind Stage
- Choose Authenticator Validation Stage
- Click Next and add name similar to previous one
- Choose WebAuthn Authentication
- For not configured action choose Force the user to configure an authenticator
- For configuration stage find default-autenticator-webauth-setup and push over to the right
- Click Next and Finish
- Click Bind existing Stage
- For Stage select default-authentication-login (or personal one)
- If you add Order number for previous part, add a higher number
- Click Create
- Go back to Flows and select your Welcome Page or defaulth-authentication-flow
- Go to Stage Bindings and for Identification Stage click Edit Stage
- Go to flow Settings
- Select passwordless flow
You should be ready to go
Authentik OAuth/ OIDC Setup - Portainer
Authentik uses many ways to connect to services, one being OAuth or Open ID Connect. This method is widely used on many services, such as Portainer.
Please follow Authentik and Portainer documentation
Authentik OAuth:
- Login to Authentik Admin Interface
- Go to Applications and select Create with Provider
- Choose a name and group
- Under URI in Launch URL enter https://portainer.cyberpaw.org
- Choose Oauth2 Provider
- Name the provider same as application
- For Authorization Flow choose Cyberpaw-authorization-flow (or default one)
- Make sure Confidential is selected for Client Type
- Copy Client ID and Client Key
- In Redirect URIs enter https://portainer.cyberpaw.org (check portainer instructions for more detail)
- For Encryption key choose default-authentic-self-signed-certificate
- Under Advanced flow settings choose Welcome to Authentick (or default one)
- Under Configure Bindings click Bind existing policy/group/users
- Select Group and choose existing group that is authorized to use this service
- Review and Submit
- The provider is created and should say it's connected to application
Portainer Steps:
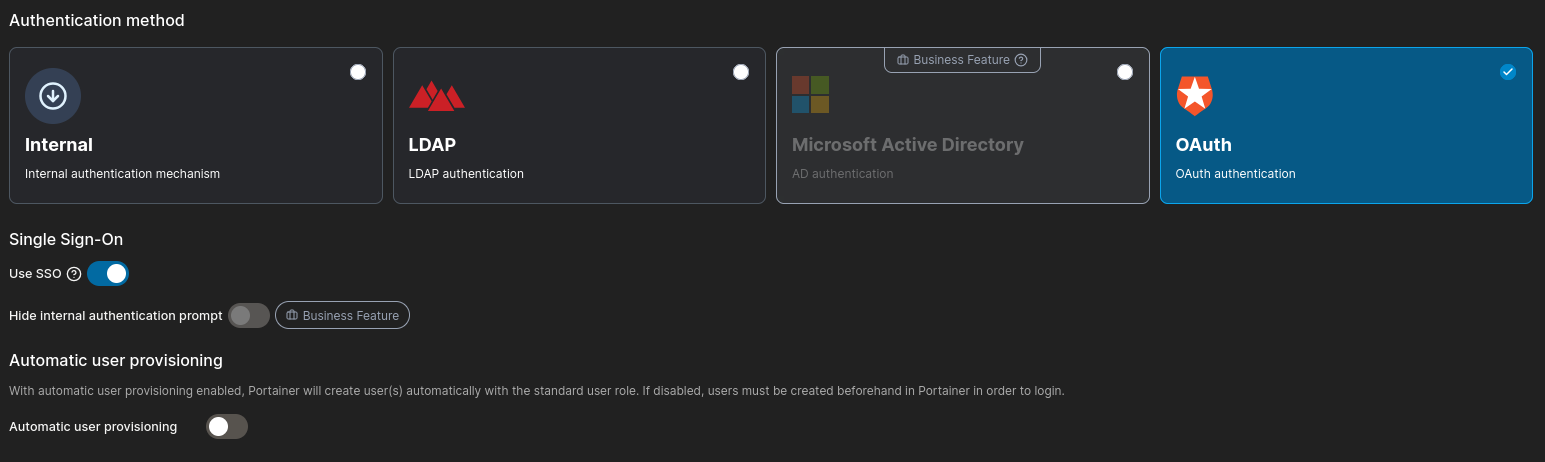
- Choose Automatic User Provisioning allowing other Authentik users that don't have Portainer user can login
- If not selected you will need to create an account with same email as Authentik user
- Scroll down to OAuth Configuration
- Copy and Paste all the field ID, secret and URLs from Provider information in Authentik
- Go back to Authentik Admin Interface
- Lower Application Section and click Providers
- Click on Portainer Provider and copy all the required information to Portainers OAuth Configuration
- For User Identification type "email"
- For Scope type "email oauth provider" -Portainer documentation says to use dashes but use space instead
- Save
- Copy and Paste all the field ID, secret and URLs from Provider information in Authentik
- Logout and you should see Login with OAuth button
Authentik OAuth/ OIDC Setup - Home Assistnat
Authentik uses many ways to connect to services, one being OAuth or Open ID Connect. This method is widely used on many services, such as Home Assistant. Home Assistant doesn't have native Open ID Connection, so we will need to use HACS for setup
Please follow Authentik and Portainer documentation
Authentik OAuth:
- Login to Authentik Admin Interface
- Go to Applications and select Create with Provider
- Choose a name and group
- Under URI in Launch URL enter https://portainer.cyberpaw.org
- Choose Oauth2 Provider
- Name the provider same as application
- For Authorization Flow choose Cyberpaw-authorization-flow (or default one)
- Make sure Confidential is selected for Client Type
- Copy Client ID and Client Key
- In Redirect URIs enter http://overseer.cyberpaw.org:8123/auth/openid/callback
- For Encryption key choose default-authentic-self-signed-certificate
- Under Advanced flow settings choose Welcome to Authentick (or default one)
- Under Configure Bindings click Bind existing policy/group/users
- Select Group and choose existing group that is authorized to use this service
- Review and Submit
- The provider is created and should say it's connected to application
Home Assistant Steps:
- Login to Home Assistant with Admin
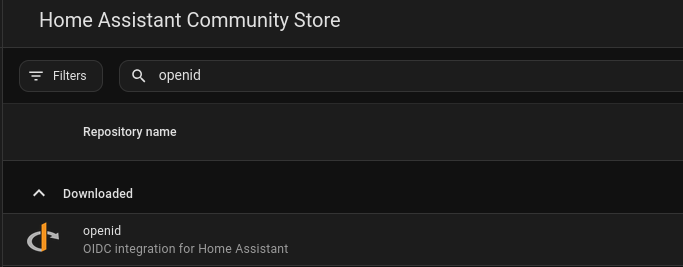
- Open HACS
- Search for hass-openid
- Go to Terminal app on HA
- Navigate to Your Home Assistant Config Directory
cd /config- Create custom_components Directory
mkdir -p /config/custom_components/openid- Download the Files from GitHub
git clone https://github.com/cavefire/hass-openid.git
cp -r hass-openid/custom_components/openid /config/custom_components/- Restart Home Assistant
- Go back to Terminal and add following configuration to configuration.yaml file
  #OAuth with Authentik
openid:
  client_id: YOUR_CLIENT_ID
  client_secret: YOUR_CLIENT_SECRET
  configure_url: "https://auth.cyberpaw.org/application/o/home-assistant/.well-known/openid-configuration"  # Replace with your Identity Provider's URL
  username_field: "email"  # Adjust based on your IdP's user info response
  scope: "openid profile email"
  block_login: false
openid_text: "Login with Authentik" # Text to display on the login page- Restart Home Assistant
If you want to disable the default Home Assistant login and only allow OpenID authentication, set block_login to true in your configuration